Sunday 28 July 2019

Dormer windows

I kind of sorted out the no-wallpaper problem, rather than just white paint the lot.  I quite literally had three small pieces of the green paper left over which got patched and joined together with a panel each side of the window and a piece beneath.  The hairiest part of that job was having such a large pattern which needed matching over very minimal pieces of paper, absolutely no room for error.  

I did this before Anna kindly offered to mail me a couple of sheets all the way from Australia.  [Thank you, Anna]  Not that she didn't comment and email me as soon as the post went up but the posts run close to what I am doing but I am often a little ahead of them in actual work. At least my having already fudged it saved me from  having to make another decision of how best to go about it.  I seem to be floundering a bit in that department right now.

As I didn't have any grey paper at all I did my best to mix a grey as close as I could get to the one in the room - it really needed a slight touch of blue but, as I keep saying, the inside of a roof flap really isn't an area which gets looked at.  It just needs to give a good impression of being finished.  I keep telling myself that.

The decorated sloping walls also have a small dado rail trim between the paint and the 'colour' as it might do in real life.


On to the windows

I prefer to cut all my trims with a saw and mitre block, even the thin ones.  My husband can go through them with a knife in a couple of passes - me?....  I find it nigh on impossible to use a knife through wood.

If you are cutting very thin trims like these you need to boost it up from the floor of the mitre block.  Generally you would add a piece of thick(ish) wood.  I didn't have any so a sacrificial eraser was used and it did just fine.


I use. 0.5mm clear acrylic for the windows and this can be cut with scissors but I find it seems to squidge all over the place between the blades so  I cut it with a very sharp, new blade, Xacto knife.  I also resort to overkill in terms of preparation.  Having once actually sliced a small piece off the end of my thumb I am super-wary of knives.

I make a template for the window (in this case I could use it to cut three windows this size).  I fasten this to my cutting mat with tacky wax (double sided sticky tape will do).  I lay the acrylic over the template and then I even tape that down with masking tape.  Both my hands are now free to focus entirely on holding a steel ruler in place and cutting along its edge.  I don't have to try and stop stuff slipping around at the same time.


This acrylic was a leftover from previous exploits and didn't have any protective film on it.  It was super-dirty and even a bit scratched.  I have better on order.  It is sensible to gently soap and water wash it before  you use it as any really gloppy finger marks or whatever can be a pain to remove once it has been transformed into a 1/12th Georgian window pane. 

This is terrific glue for putting in windows but doesn't come cheap.  That said it has lasted me through several builds.  It does dry clear so if you are a bit messy with glue it won'r ruin your glazing. It also gives you some working time to get things positioned correctly.  It is water based for easy clean up and does a great job of sticking acrylic to a painted surface.


I don't know about you but every time I come to a glue I haven't used in a while I have to go tunneling for the glue down a teeny little hole.  This is my weapon of choice and is just dropped in my handy-on-my-desk box.  It saves a lot of bodging with pins, needles, toothpicks, dental picks, fine tweezers and a gazillion other things I used before I 'invented' this.  It even comes with its own handle, what's not to like.  


So.....  a very small amount of glue round the edges of the 'glass' and press it into place. In this case, on the lower half of the back of the window frames.


all four sides eventually had glue


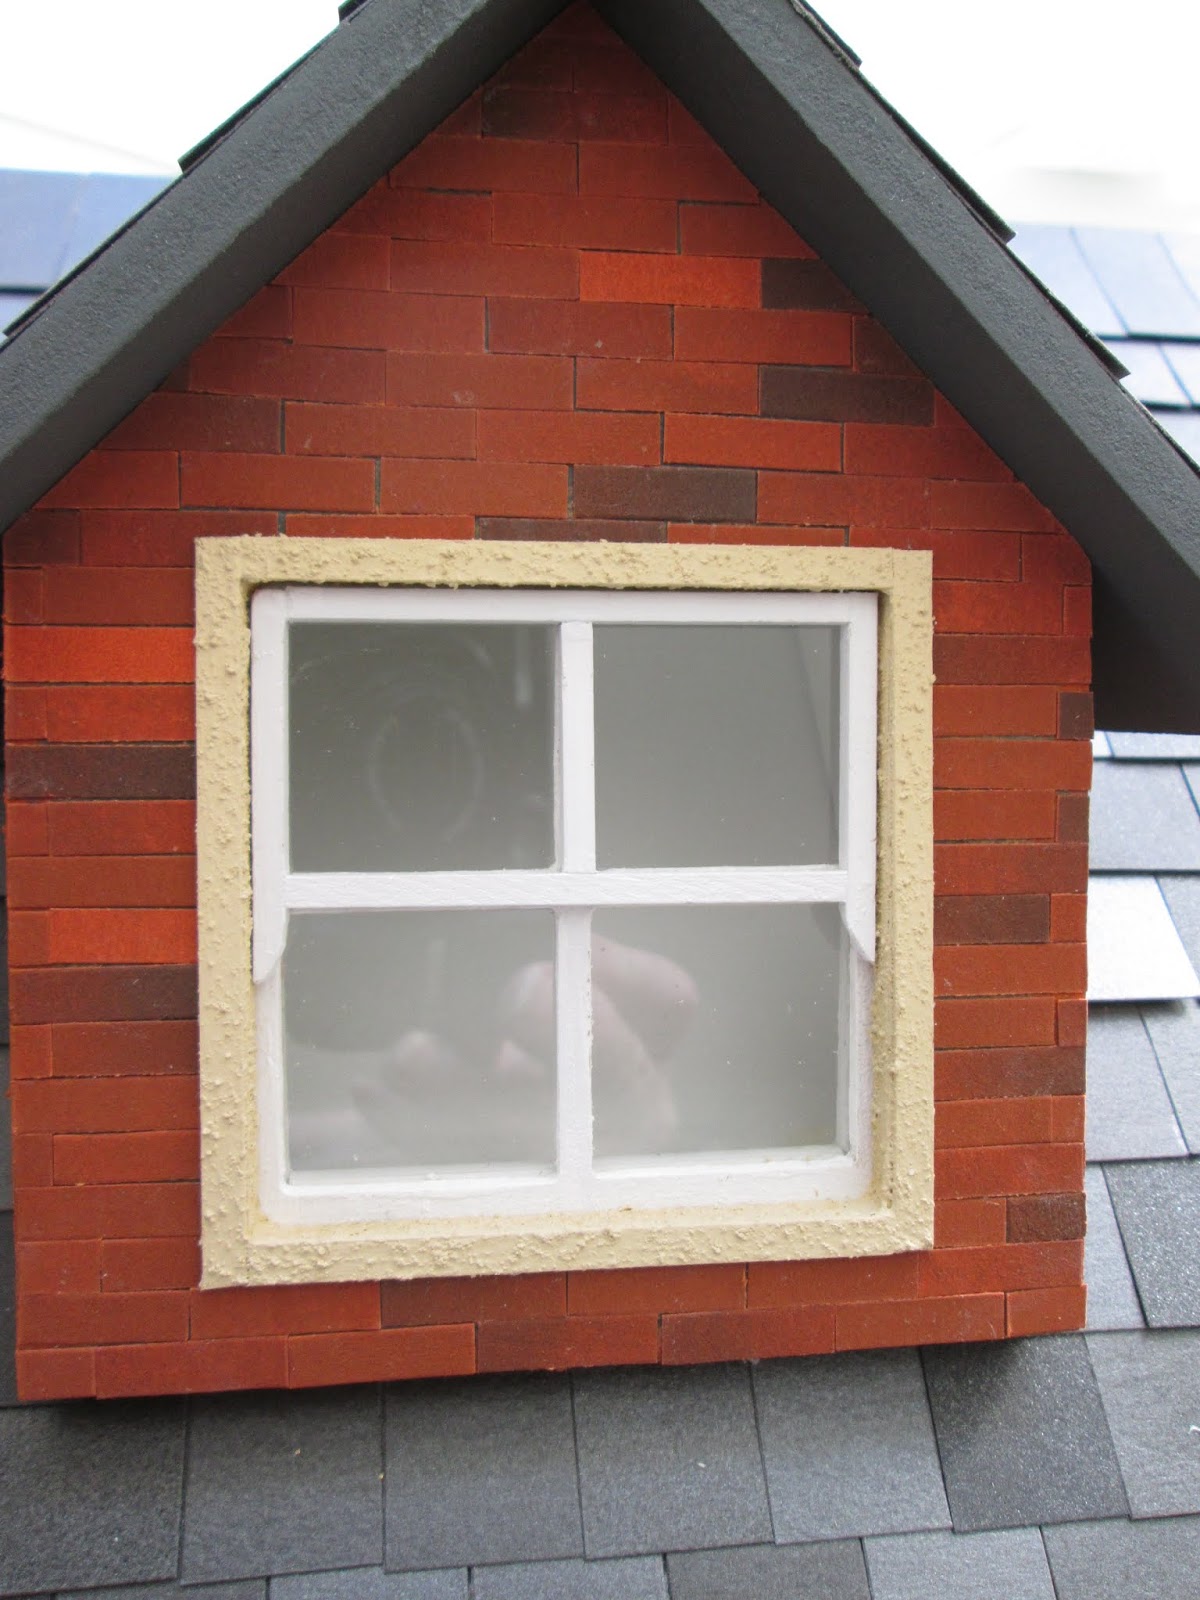
It was then just a case of adding trims to make the bottom (inside) half of a sash window.  there will be architrave trims round this when they arrive. plus roller blinds to tweak it up a little and conceal even more dubious finishes.


I may have thoroughly shot myself in the foot with my latest dopey idea to 'improve the basic build.  Painting 27 sticks, cutting 264 smaller pieces very accurately, cutting two pieces of glazing for every window rather than one and then assembling this lot to make 16 'mock' sash windows is most probably very pointless.  As you all know once you set off on one of these paths there is no going back.  

Clearly that wasn't challenging enough, so I decided authentic windows needed those little nubs on the frame to stop them thumping down or up.  These require spot on measuring and judicious carving and sanding of just the right amount of stick to shape them and...... hey.......  I only have 64 of these to make.

Here is the before and after photo of the outside.


before
after


before


after

Yes, I know it is not earth-shatteringly amazing but it feeds the soul of a slightly bonkers mini-enthusiast.

Monday 22 July 2019

The fourth Wall

I am pretty much all finished with the construction and decorating of each room.  I have a few locks, alarms and (mock) electrical outlets of various sorts to add in, otherwise the rooms are done; so it is on to the fourth wall.

I suspect there may be extremely well-organised and finely tuned planning type folk who do any work on the inside of the wall before it even gets attached to the house.  This is not for me I'm afraid.  I want the whole outside of the house done first.  I am sure it is a sort of psychological thing of working on a (real-to-me) completed building.  The exterior finishes might then 'suffer' if they were laid down to allow work to be done flat on the table when doing the inside.  I also want the doors and roof on fairly quickly to reduce the amount of dust collecting inside the house.  My two main fourth walls, therefore (for me), have to be tackled in situ, which means working on a vertical plane.


The big debate


There are various schools of thought when it comes to finishing the fourth wall of an English-style dollshouse.  


1. Some feel it is best simply painted in a muted colour and left alone so that it doesn't detract from the finished rooms when you open the doors.  This seems a very reasonable stance to me and makes for an easy finish to the project.

2. Others feel the fourth wall should look exactly as it would if it were actually a fixed wall in the house.  It is therefore completely decorated and trimmed and dressed and even furnished by attaching furniture to the wall or making a small platform for it, also attached to the wall.  Generally these folk, treating it literally as the  fourth wall of their room, will complete this area at the same time as doing the other three walls.  One room at a time.   This seems a very reasonable stance to me and makes for an easy finish to the project.


3. I never have any idea of which way to go.  On every project I have honed my procrastination skills in respect of the fourth wall and just entirely ignored it until I have to deal with it.  I have then gone on to compromise and try to find a middle ground where the walls get decorated and the windows dressed and I leave it at that.  Any furniture standing against that wall simply stands in the house.  That takes some thinking about as you don't want to see the backs of most things or obscure the view, but there is usually some sort of wriggle round it if you choose the item carefully. 


I am very happy with this level of distraction that the decorated 'doors' create when viewing the open house and it does mean that the windows look finished when seen from the outside.  That will do nicely for me.  
This seems a very reasonable stance to me and makes for an easy finish to the project.

Feel free to go with any of these three or your own mix, there is no right or better way to finish the fourth wall.


Let's start with the dormer


When you start any work of any kind, it is wise to sort out every little thing you are going to need before you begin.  In this case two kinds of trim, two kinds of paint, wallpaper, two kinds of glue and a bunch of different tools such as scissors, saw, mitre block, brushes, rules, pencil, eraser and probably more.  This is a vital step - you will understand why later.


I find it impossible to work on a roof flap in situ - the height of the house means I would be working on a step-stool and everything would be upside down: I, therefore, removed the roof from the main house and flipped it over to work on.


I was nervy about doing this as I didn't want to damage the finished work on the outside.  Luckily it seemed to be OK and everything was lying neatly in place underneath


Here comes another 'don't skip this' step.  Make a (very scribbled) plan of what you intend to do.  This helps in a few ways.  Firstly the orientation has been flipped and your left is now your right, so it is important to be clear which colour paint or wallpaper goes in which place.  You want to think about any trims you might want to add and how they will interact with the edges of the room and trims you have in there.  They must be clear of those edges or the roof won't close properly.  In my case I also needed know where I wanted the white paint to go and I like to avoid drawing all over the actual piece and marking up with pencil.  It often bleeds into glue or paint if you leave it behind and it is sometimes hard to rub out.  I like to have the measurements all worked out on my diagram and then use masking tape to outline the various spaces.  I don't want to be continually working out what goes where as I go along; so, the rough sketch with measurements keeps me on task.


Eventually I want to improve all the windows in my build and try and make them look like sash windows.  I will need to add a lot of trims (starting with the dormer) and I always like this sort of thing to be ready to go when I need them so, although I only need a few for the dormer, I may as well paint the lot.  There are a couple of pieces of dado rail here too that I will be using.


Another handy tip..... buy the very best quality trims you can find/afford.  I get some very good quality wood ones from J & A Supplies when I am at a show, but I can't see them on his website.  I didn't do this with these trims (1/8th inch x 1/8th inch square).  I wanted so many I bought a ton of cheap ones from Hobby's.  They immediately want to bend as soon as paint touches them [painting all four sides pretty much mitigates this] and they are not super smooth to begin with and the wood produces quite a lot of nubs when wet.  All this will be manageable but better quality can save you some blood sweat and tears.

Here is my quick way of painting these -

Dab some generous dobs of paint along one edge.....


....... rub it along the wood gently, keep dobbing and rubbing all the sides and work your way along the trim roughly a third at a a time.  Leave them to dry.


I did the maths and I painted 27 trims x 19.5 inches x 4 sides x 2 coats and that's about 350 feet of fiddling with paint.   Don't be deterred it is a pretty pleasant mindless task and they only took a little over two hours..


Dormers are notoriously badly made - it is not my assembly skills - more the maker's design/cutting.  The worst of this particular one is the bottom of the window which luckily is a sort of overhang and looks fine from the outside but from the inside there is a decided gap.


I covered this with a piece of (already painted) leftover simple coving.  The configuration doesn't make a lot of sense in real life world but will suffice for this roof flap which is never really scrutinised and merely gets lifted up out of the way.


Each side of the roof has the wallpaper areas outlined with masking tape so the rest can all be painted white.  The centre room will be all white as it is the kitchen, so there are only two small wallpaper additions needed.


As I said the inside edges were pretty gappy.......


.........  but a coat of paint improved them greatly


I always make a template for any wallpaper even ones that seem to be simple rectangles (they never are).  The wallpaper itself is not particularly cheap or easy to find so best to get it right first time.  This template is just a piece of ordinary A4 printer paper.


After painting I had two areas like this waiting to be papered.


Here comes a bit of an aside.   Way back when, I bought an A1 portfolio very cheaply from eBay which stores my wallpaper beautifully; no rolling and then trying to flatten it, no knocked up edges or grubbiness.  I commend it to you.


This is where tragedy struck and my following my first instruction would have been useful.  I don't have any green wallpaper big enough to cover the space.  Yes, I have checked here there and everywhere on line and no one has it.  It was on its way out of Dolls House Emporium when I bought it on sale several years ago.  A couple of other folk had it but they don't any longer.

 As for the grey paper I don't have a shred of it.  There is absolutely no hope of getting this one as I bought years ago from some Etsy maker (in New Zealand I think!) who made to order and was also 'winding up'.  I did waste a lot of time 'just checking' though.

I have a white flap with two unpainted areas waiting to be covered.  I could just paint them white and get on with it but I had already measured and drawn up a plan and painted and cut dado rails and masked and carefully painted, all with a view to papering... .... all of which was a complete waste of time and brain power if I just ended up with a white flap.


So the current state of play is me walking away and controlling the urge to rant or cry and eventually coming up with a not very great solution.  Come back next time if you can stand the excitement of watching paint dry.


Sunday 14 July 2019

Probably my last plants

I was looking through my stash of things to see if I had a pot for my proposed Swiss cheese plant and discovered a white rose kit which was a lovely surprise.  This led to continuing the stock check to see if I had enough vases or pots or whatever for my proposed three plants; inexorably this led to me treating myself to these.


I wanted to share this purchase in case you are looking for perfect scale, hand blown, paper-thin glass at a price you can afford.  The vendor is just the very best.  Glasscraft
Nothing here costs more than £7 ($8.80) and the cute tadpole in a jam jar at the front was all of £3.50 ($4.40)


The bon-bon dish is 'silver' with two gilded cranberry glass dishes


The perfume bottle has a removable long-stemmed perfume stopper and is incredibly dainty


apologies I put the stopper back in wonky.
With enough vases now but still no answer to the Swiss cheese plant container I decided to press on.

Ladies Mile Miniatures


as usual I added veins
wires glued to the back

I made a cardboard pot; later it was painted silver grey.  In these pictures it is at its inception with the surplus cardboard on its bottom waiting to be cut off, trim added and then painted.


When the leaves were all cut to different lengths but not yet finished, they were shoved into their proposed embryonic container and placed in the room to see if they were going to work.
chair at the front with plant at the back??
the reverse version??


The grey pot was soon discarded as it was too clunky and I found this over-size vase/pot in my things and used this.  The leaves were bent into shape and glazed with Americana triple thick brush on gloss and glaze - any pva glue will do the job.


The first decision for the final room was this


After eating a pizza and wondering what to do with the lovely little 'table' in the box the next iteration became this.

now centre front and small rocking chair added into the left hand corner

 It sits very well on its pizza box spacer, smack bang in the dormer window grabbing all the light it can.


So, on to the roses.  I have shown you a picture of the real plant first, so you can see how careful Theresa Stringer is in making her plants realistic.


Rosa x alba 'Alba Semiplena'


White rose of York

the real one
great kit as always Ladies Mile Miniatures
top
side
back
ten and and one extra

Looks best in front of the mirror .......


............. but I wanted them on this side of the hall where there was going to be a painting but I think they will be too 'busy in front of that.  I have a fetish for symmetry.

This little tweak will cost me a good amount of money as I now have to buy another Jim Coates Trumeau mirror for the other side of the hall for perfect symmetry.  The postage will cost me as much as the mirror.

My second flower was a rose.
Pink Standard Rose 'Maiden's Blush


the real one


Ladies Mile Miniatures
in process
top
side


 I loved making the buds.  The pieces for these buds/centre of the rose are cut on a sort of angle - like a child's windmill so they 'want' to overlap each other.  If you just gently roll them between your fingers they fold over each other beautifully.


A word about stamens - all flower makes start with adding a small blob of glue to one end of the paper covered wire to stop the petals being pushed off.  You need to decide if this is going to be visible or not and, if visible, what colour it needs to be painted.  In something like these roses they were not intended to be seen so they can be left like this.  The glue dries almost clear and takes on the colour of the green paper underneath so they are very subtle.


ta - dah

This story has a bit of a sad ending.  I bought these for the music room without really thinking about it and now realise they just don't look nice in there.  It proved difficult to find a place for some flowers in that room and, if I did, they really need to be yellow as the room is grey and gold, this pink just jars.  Hey ho, one for the sell-it box.