Showing posts with label The Mud Room. Show all posts

Sunday, 1 July 2018

A day late

Apologies for being a day late with this week's post.  I spent my blog time yesterday fiddling around making a digital book to record Bentleys (a previous build).  More of this when it comes to fruition but suffice it to say it took much, much longer to do than I imagined.

Meanwhile in dribs and drabs throughout the week I managed to get the Rec room and the Mud room sorted.

These are the terrific boxes I keep my 'dressing stuff in.  They were sold as bead boxes for a couple of dollars in Wal Mart.  I try to collect things for one room in the same box so I don't forget what I have and duplicate things.


That worked really well with the three cats I seem to have acquired.  At least the quality improves as I go along.  All I can say is that I once owned a cat as ugly as the first one here.  He was also extremely stupid and quickly earned the name pudding, so I have something of an attachment to the ugliest one.  I suspect Mrs Perky on the right will get to inhabit the house.


A couple of the mini objects in this house sort of work.  The jukebox lights up and plays a couple of songs and the washing machine in the mud room is a Miele (can't find them any more!!!) and it lights up, the drum spins, it makes washing noises and then makes a spinning noise followed by a beep when the washing is finished.  The door also opens.  Such a nice piece of kit.  I used to have their cooker too in a previous project and that had hobs that lit and made cooking noises.


I am especially fond of this little basket of sea shells as they were all found by me during my time in Naples (Florida)  I had a sort of challenge with myself to find the smallest shell possible each time we went to the beach and I ended up with a zillion very teeny ones.  They are miniatures in their own right.


These must be the world's tidiest teenagers - biscuits on a plate and liquorice allsorts in a bowl!!!  What can I say.....I train my children well...... especially the resin ones.  Incidentally every sweetie and every biscuit is a loose separate item.  Such talented people around.  For non-UK chums each of these biscuits is a recognisable product.


My favourite object here is the cute little stapler.  Needs a bit more 'stuff' yet


Pretty much a shell collection going on here.  Indeed there is a box open with two new shells in that haven't found their home yet.  Again it needs games and stuff for the empty shells.  The china piggy bank is in memory of one I had for many, many years called Daisy Grunter.  Spot the mobile phone.


.....   and so the room goes back together......  I need a couple of posters for the back wall.  I am just not sure what to have.  Might go retro and have something to represent what my kids liked .....Star Wars? and....?


A few nice details in the mud room such as the whiteboard weekly planning sheet with pen on the wall, the smoke alarm, the alarm system board for this part of the house.  There is cleaning stuff left out as Simon has been cleaning his skate board.  Apologies for the poor quality photo, it was taken late in the day and in poor light.


I have just added a couple of things in the dining room since you last saw it.  I love the tiny glass horse on the huntboard, bought when I was doing quarter scale.  This photo reminds me that I need to clean up and re-trim the chairs.  They had some very flashy gold braid round them that I unceremoniously ripped off.  I really need to get down to filling the cabinets and dressing the tables - I actually have more than I need to do this.  I keep sort of hanging on in hopes of making another huntboard which is silly as that in itself doesn't prohibit dressing what's there.  Apologies for the BFG in the mirror.


Saturday, 25 March 2017

Take a breather

I am not alone in mini world in believing that 'thinking' is a huge part of 'doing'.  I suspect I spend as more time 'off' the project thinking about it, researching for it, problem solving, shopping, seeking inspiration than I am actually hands on doing.

Now and then I gather all my thoughts and clobber together and see just how much of the house I am able to complete.  I dress each room as much as I can, using the furniture I will keep for that room and other stuff as stand-ins just to give me an idea of what's to come.

From this I can figure out what I might need to complete the room and the order of work.

So this is where I am up to:

The basement which has the Rec Room, the Hive and the Mud Room, is finished other than collecting a gazillion little bits and pieces to dress the three rooms.

The ground floor which has the Dining Room and the Vestibule and the small Sitting Room, is fully decorated and lit except for a couple of lamps and one ceiling rose.  I also have most of the furniture.


Dining Room using some stand in furniture

Sitting Room using stand in table and mirror


The upstairs which has the Music Room and the Library is where I am working now and has some furniture waiting for it, which is helping me find where to put the fire and lights etc.


Music Room - a mix of keepers and chuckers

Library with proper table and chair and some stand ins


The attic level which has the Bedroom (bathroom off there) and open plan Kitchen and Sitting Room seems a long way off right now, but I need to be working towards it in case I find things at a show that would be useful for it. 


kitchen and sitting room - paper cupboards


bedroom - paper bed and cupboards and borrowed desk


Doing this dress rehearsal has the benefit of clearing up my work area and, being a bear of tiny brain, I need a clear pathway to enable clear thinking.  I can keep my perpetual shopping list up to date and order anything practical that I am going to need to let me get on with the step after the one I am currently working on.  I hate being held up for a door knob or something silly like that.

Hope you had fun deciding which pieces are staying in which room and which things were stand-ins.


- - - - - - - - - - - - - - - - - - - - - - - - - - - - - 

I thought I might just do a post scrip in case it helps somebody.

While I was having my grand tidy up I dropped a plaster ceiling rose (aaarrggghh).  If you are lucky and it breaks leaving you all the pieces you can fix it and use it.

two pieces broken out

the solution


I peeled off one side of double sided sticky tape (it is very, very thin) and stuck the pieces carefully in place.  I then trimmed off the surplus tape.  The fine cracks will fill in perfectly if you want to put a coat of paint over it.  I am not even bothering to do that - they really are not visible when its on the ceiling.  When I come to stick the rose in place I will remove the other covering from the tape and the exposed double sided tape will help in the process of sticking the rose to the ceiling.

Moral of the story is don't bin something in a temper (as I nearly did) put it aside for a while and see if you can find a solution.

Saturday, 15 October 2016

Adding details - the Mud Room

I have gone through all three basement rooms and added plug sockets at floor and work surface levels, an alarm control system and PIRs in the other rooms and a smoke alarm for this floor level.


http://www.delphminiatures.co.uk/

http://www.delphminiatures.co.uk/

http://www.delphminiatures.co.uk/

http://www.delphminiatures.co.uk/


I also managed to add a bit of dressing....


http://www.delphminiatures.co.uk/


Saturday, 6 August 2016

Radiator

Another of Delph's products I really like and return to when I can is their radiators.


They can be used as in the above photo showing the in and out pipe going into the floor.


Lift them a little above the skirting board and they have a different sort of configuration.  I looked at the radiators in my house and they are different even to this.  They have a flexible water pipe hidden behind the radiator itself and so they sort of 'float' on the wall.

Being me, I just had to have this arrangement,  Simple solution..... I just nipped off a bit of the pipe and stuck it on the back of its remaining stump.


Here it is, in situ,  in the mud room.


Saturday, 30 July 2016

ELF kit - the mud room (2)

Eventually all the painting is done.  There are three coats of white matt emulsion rubbed down with the finest abrasive surface you can get hold of.  Even 400 grit sandpaper is too rough for this.  Just a scrumpled brown paper bag does quite a good job but you can get pads used by painters for plaster-work and for rubbing down between coats of paint from the painters section of a decent DIY store.  They last ages and are the very best for all kinds of smoothing work at this scale.


three coats later

The following picture shows the next three steps in the make.
  • The cupboards have been assembled.  
  • They are then waxed.  I use Antiquax (on the recommendation of ELF).  As usual apply thinly and evenly and allow to dry then buff up with soft cloth, you can add more coats if you want more sheen.  I am not trying to achieve a shine just a smooth finish.
  • The handles have been added.  By sheer chance I had exactly the right size drill bit for the stems of these handles so they are a really tight fit.  In fact they needed a gentle tap with a small hammer to get them completely seated.  So no glue was needed.

Now to win the prize for the most convoluted wiring exercise ever.  This is how not to approach any wiring in your house.  I thought it was worth a share to show you what can go wrong when you are a twerp.

I wanted lights under my cupboard.  I got the perfect kit from ELF.  They are very thin sticky-backed LEDs that can be wired into my power strip just like any other light.


A normal person would stick them under the cupboard and take the wires straight through the back of the house (as recommended).  Not for me....

Firstly they were going on an added inner wall which was three plus inches away from the back of the house and now had no access to the back wall from inside the house unless you could thread your arm through a door and down a corridor and work blind.  Yes, gentle reader that's what I did.  Here's how it went.

Not content with this difficulty I had also added a trim at the front bottom edge of the cupboard to make sure you couldn't see the lights.  This would only be possible if you were at precisely the right height from the floor and standing on your head. As I am never sure when I might want to do this, a trim was vital.

That done, I decided I was taking no chances with any 'slack wire being visible - why would it be slack?  I drilled a hole in the base of the cupboard and another hole in the back of the cupboard for the wires to pass through.  Such fun threading through the first hole (not).


Even more fun passing the wire through the second hole when you can't possibly get your hand inside the box.  Yet there was even more fun to follow.


Having worked out where the wires would exit the cupboard I carefully measured and marked the positions on the inner wall.


Now I needed to work out where they would appear on the back of the house.  To save me having to accurately measure rooms and wall thicknesses and do any totting up, here's the contraption I came up with to determine that the hole would be 19.5 inches from the edge of the house and 5.75 inches up from the bottom edge.


 Now I needed a way to get the wire through the inner wall and then through the outer wall across a 'corridor'. I drilled all four holes with a drill bit a little larger than the straw/coffee stirrer I was using as a conduit.  I then threaded the stirrer through the front hole, threaded my arm at an awkward angle though a doorway and down the corridor and felt around for the exit hole and eventually guided the end of the straw through that, by touch.  I now had a 'bridge' between the walls for the wire to pass through.  I made that sound easy.  It wasn't.  I am not sure how well you can see the straw here.


There is a better picture here at the back of the house.


Was it worth it?  Well yes I think so but, as I said earlier, I am a twerp.


All the other cupboards went in place and I just needed to add the skirting board.  This is where I discovered there wasn't enough space between the machines and the walls to get in even the thinnest of thin skirting boards.  I couldn't slap it in front the the machines - it would look clunky and the machines would never come out in real life or this one.

Inspired thinking I added a quarter scale coving as the sort of trim you sometimes get with laminate flooring.  Forget mine goes in (coving) where it should come out (quarter round beading) and its a jolly good fix.


So there we go, job done, one mud room fitted.


For my last twerp confession in this post, lest you should think I am too smart to live...

I drilled a hole in the wrong place!!!!!


I have absolutely no spatial whatevers, so when I am working at the back where right becomes left etc I am scuppered.  I knew the holes should be four and something inches apart and that the second hole was to the right....  but that's to the right from the front view but now, of course, it needed to be to the left.  The Rec room now has a hole in a place I can't cover or use in any way.  I don't want to think about how to 'cure' this right now as I am too busy howling!!!


Saturday, 23 July 2016

ELF kit - the mud room

  
I think I shared this a while ago....


ELF kit for my mud room

Those pieces of wood, plus a washing machine and a fridge are destined to become this....

The plan
This is a piece of dark mahogany for the work surface.  The dark shiny area is just a small amount of Antiquax (solid wax polish) rubbed in for a finish.  The contrast between the 'raw' wood and the waxed wood is amazing.

magical finish with wax

The finished piece - one coat of wax applied with a cloth or a brush (I prefer cloth), let it dry and buff with soft cloth.  Do more coats if you like.


ready and waiting


First make a box for the cupboard and then repeat ...... three times for the lower cupboards and twice for the wall cupboards


The spare pieces are 'feet' and also act as plinth supports


When you have made the boxes do a dry fit........ and discover they don't fit!!  Entirely my fault I gave Elizabeth the wrong measurements!!!  Gave her the front of the room measurements which differs by quite a lot from the back of the room.  Talk about rookie error!!


The aaaaarrrggghhh moment
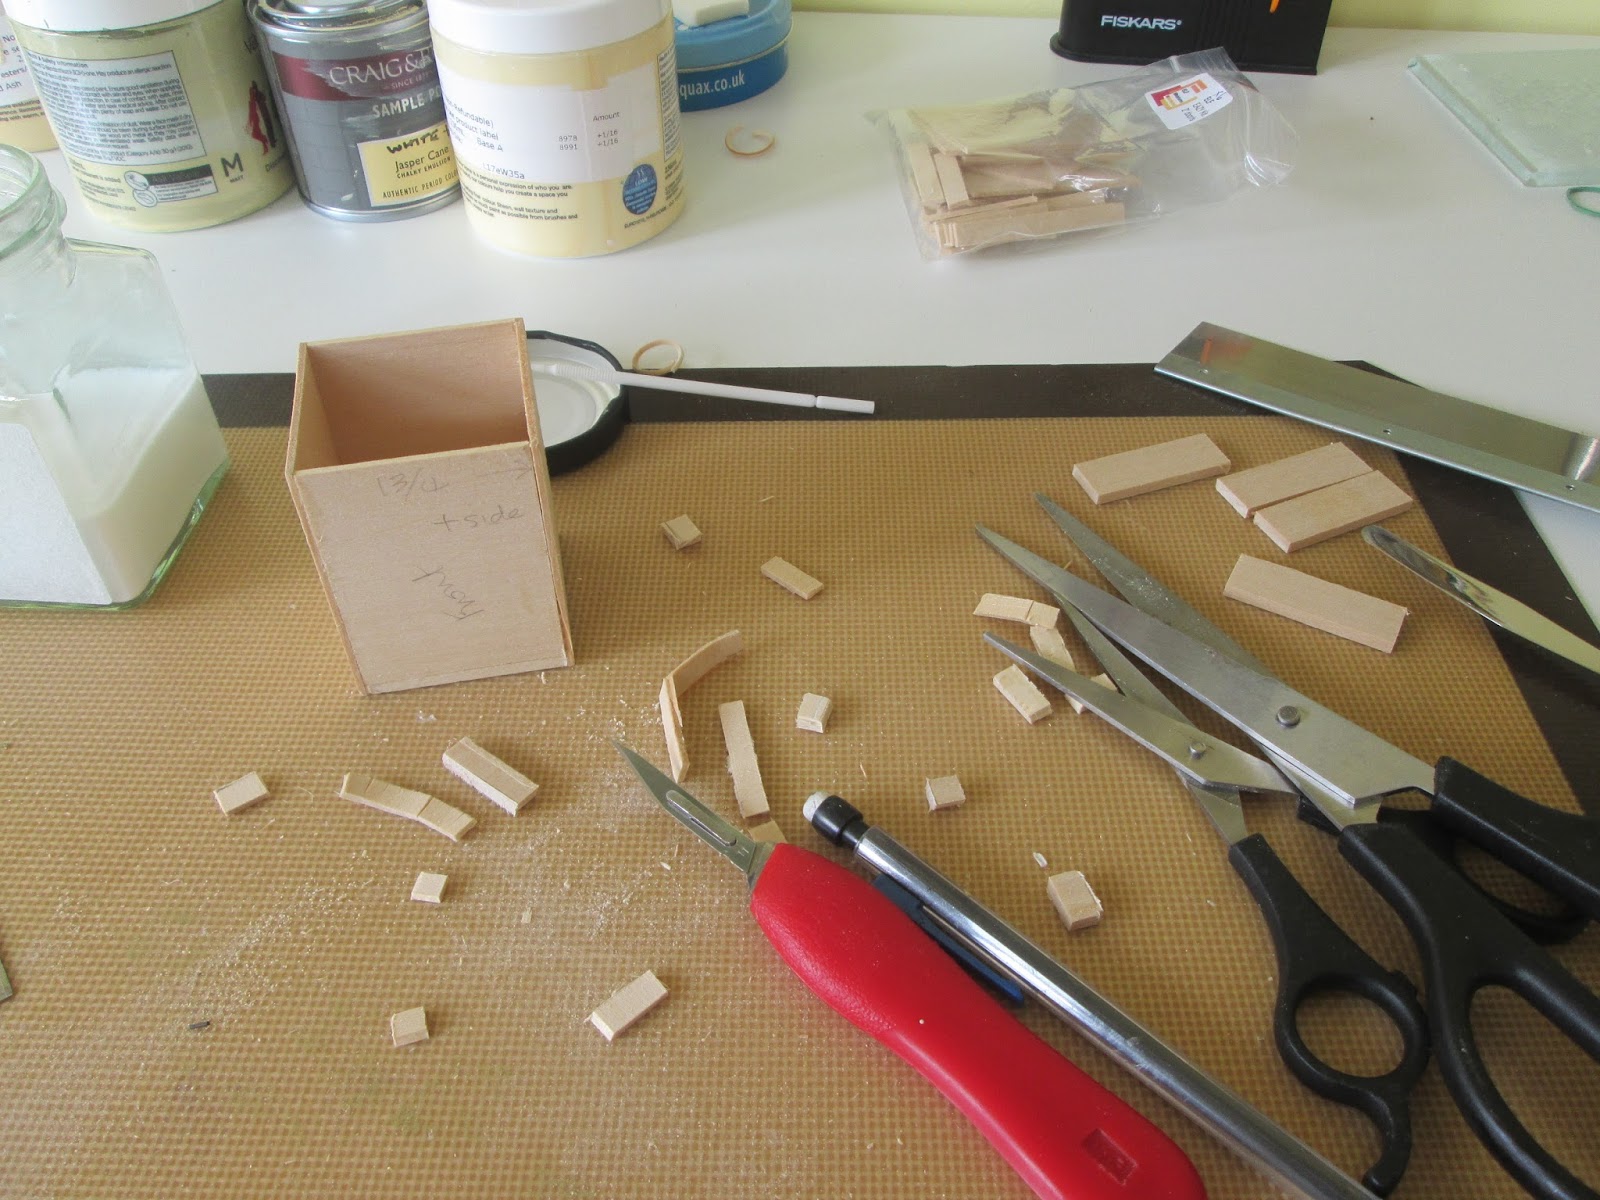
The two side cupboards need a quarter of an inch shaved off them.  Not easy to disassemble glued bass wood without it snapping.


saw, knife, scissors, whatever it takes

Do a dry fit again and this time the cupboards can be glued together


....... and feet and plinth added


Ta dah - they fit

Just need their doors

The wall cupboards are made in a similar way

make the basic boxes

Add a trim to the bottom of the cupboard to conceal the lights I will be putting under them.

three pieces cut ready to glue in place

Add a trim to the cupboard top


This will have an architrave added to this support piece

All the basic cupboard pieces are assembled.  Now for the job I don't especially like.  They will all need painting before assembly.  


44 bits of wood


Here's a link to ELF if you want to take a look round - lovely stuff.