Showing posts with label The Hive. Show all posts

Sunday, 23 June 2019

Last (but one!) lap on the lighting


I am very proud of me:  I actually did what I said and finished putting in the last of my lights today.  I seem to have saved up one ceiling light, four table lamps and one standard lamp.

Here's a quick review of putting in a ceiling light - they are the easiest ones to do.  Just make sure you know exactly where you want it in the room and measure carefully or even better make a template.  If I want one in an 'odd' place I make a template of the floor - sounds 'posh' - all I mean is cut a piece of paper to fit the floor.  I, then, position furniture on it and mark where I would the ceiling light to go.  This is useful for a light over a dining table for example.  I then take the template upstairs to the floor above and make sure it is lined up with the front edges and  the side edges of the room below and make a mark through the paper where I want to drill the hole for the light.

If you have room in your tool storage area this is a convenient way to keep your drill bits


Always cut off any straggly exposed wires, they are a pain to thread through holes


It is much easier with a fairly rigid piece of wire.


I normally apply a little superglue (it must be the gel version) with a cocktail stick to the back of the light fitting; this is short cutting it.  I also usually remove the sticky tabs lights that come with most lights and put the glue on the rim  I don't like how they stick out from the ceiling and they don't have very strong glue on them.  This one was very thin, didn't show,  so I just left it in place


Pull wires through gently and get it in position preferably in one go.  Make sure if there is a wire exit hole on your light it is at the back so it can't be seen.  A helper here is handy - press and hold in place until the glue 'takes'.


Every time I mess about with a light I test it just to check it is OK


This is easily done by stripping the wires again and holding on each terminal of a 9 volt battery


If you want even more detailed explanations of putting in lights - showing grooves in the floors etc just click on the 'Lighting' label on the left and there is probably a ton of stuff there.  I think I did a video too so just go over to You-tube if you want.  There is a link for that too.

So the ceiling light is done, now over to the lamps.

A while ago I asked the Brilliant Kath at Delph Miniatures if she could let me have some of her plug sockets that she uses for her electrical appliances as I wanted to drill a hole through them so I could take wires from lamps through the wall behind so making it look as though the lamp is plugged in.  She not only did that but also drilled the holes for me.  They are even drilled at an angle - sloping - so the cord lies realistically down the wall.  She went on to make them for general sale - so you can get them if you want them.  Here's the link to that page on her site.  Delph Miniatures


Here's how they go in.


the socket with a hole


wire threaded though


hole drilled in wall and socket in place


other side of wall


eh voila - one plugged in lamp

Here are my finished lamps.


Stand back and admire, because when I re-dress the rooms not one of them will actually be seen!!!  This is when we know mini people are completely nuts.

So what was all the fuss about.  In less than a couple of hours including a tea break, they were done and dusted.  I think I have broken my duck now on 'not working on Dalton' and I can't wait to tackle the actual putting in the leccy tomorrow:


Sunday, 10 June 2018

First things first

Before I can crack on with anything else such as lighting or the fourth walls or drapery I need to put the rooms back to rights.

I had six boxes packed with the mini house contents and I assumed they would pretty much be one box per room but discovered that wasn't the case as soon as I began to unpack them.  I had used the space judiciously and  fitted in what I could where.  The first two boxes revealed the mixed contents of three rooms.  Decision made.... I opened each box and just shoved the objects found into the room where it would eventually reside.  They will get sorted one by one.
I so hate muddles

I count my blessings that only one item was damaged in the move and it wasn't such a precious one, other than the time I had put into making it.


quickly sorted with a little wood glue and a good squeeze

After doing a rough sort I concentrated on getting one room right.  For today I only had time to do the one.... the Hive (my workroom in the basement)


The Ikea corner worktable still had all its little things in place and I was able to give it a quick dust over with a soft paintbrush.
It is hard to pick a favourite object

The swivel chair swivels and the scale of the off-cuts of wood is just perfect.  I think they came from a Jane Harrop kit along with the wallpaper and flooring.  I remember making the cardboard boxes and rolling the paper and finding more wood.  

love the extension lead - Delph probably

The IKEA computer trolley is a copy of my real one.  Unfortunately the processor unit is too big for its space (not in real life).  the castors really work and the keyboard tray slides in and out.  I remember the very many coats of paint I had to apply to get a proper IKEA finish on these pieces of furniture.

one of my favourite bits of furniture

Another IKEA copy - my trolley that my Dalton sits on is just like this and has castors so I can get to the back for wiring or just to move it from A to B easily.  Since this basic concept I have added drawers to my real one but this is just fine as a reminder as to where it all began.

The Jane Harrop dolls house has a roof panels than comes off allowing the front to be removed.  You could quite easily complete this with 144th paper, paint and furniture.


Love the working castors

This is a view of the room with everything back in place.  It used to be the housekeepers room in the original house and still has the lockable Georgian linen cupboards at the back of the room - great storage for Elizabeth's mini stuff.

note the radiator and the plug sockets

This room just needs a multi-frame picture on the wall containing family photos which is what I have in my room.

I have gone through many transformations of my work space since this mini room began so my current (new) room doesn't look like this but the trolley and the computer table remain and I have memories of working at that corner table in the spare room and then the summer house through one summer a few years ago.

Apropos of nothing in particular I came across this image which amused me as we still have a sort of 'open-all-hours' hardware in the village we have moved to not too dissimilar to this.  What a cracking project for somebody.

This is not ancient history but post-war (my own childhood)


Saturday, 25 March 2017

Take a breather

I am not alone in mini world in believing that 'thinking' is a huge part of 'doing'.  I suspect I spend as more time 'off' the project thinking about it, researching for it, problem solving, shopping, seeking inspiration than I am actually hands on doing.

Now and then I gather all my thoughts and clobber together and see just how much of the house I am able to complete.  I dress each room as much as I can, using the furniture I will keep for that room and other stuff as stand-ins just to give me an idea of what's to come.

From this I can figure out what I might need to complete the room and the order of work.

So this is where I am up to:

The basement which has the Rec Room, the Hive and the Mud Room, is finished other than collecting a gazillion little bits and pieces to dress the three rooms.

The ground floor which has the Dining Room and the Vestibule and the small Sitting Room, is fully decorated and lit except for a couple of lamps and one ceiling rose.  I also have most of the furniture.


Dining Room using some stand in furniture

Sitting Room using stand in table and mirror


The upstairs which has the Music Room and the Library is where I am working now and has some furniture waiting for it, which is helping me find where to put the fire and lights etc.


Music Room - a mix of keepers and chuckers

Library with proper table and chair and some stand ins


The attic level which has the Bedroom (bathroom off there) and open plan Kitchen and Sitting Room seems a long way off right now, but I need to be working towards it in case I find things at a show that would be useful for it. 


kitchen and sitting room - paper cupboards


bedroom - paper bed and cupboards and borrowed desk


Doing this dress rehearsal has the benefit of clearing up my work area and, being a bear of tiny brain, I need a clear pathway to enable clear thinking.  I can keep my perpetual shopping list up to date and order anything practical that I am going to need to let me get on with the step after the one I am currently working on.  I hate being held up for a door knob or something silly like that.

Hope you had fun deciding which pieces are staying in which room and which things were stand-ins.


- - - - - - - - - - - - - - - - - - - - - - - - - - - - - 

I thought I might just do a post scrip in case it helps somebody.

While I was having my grand tidy up I dropped a plaster ceiling rose (aaarrggghh).  If you are lucky and it breaks leaving you all the pieces you can fix it and use it.

two pieces broken out

the solution


I peeled off one side of double sided sticky tape (it is very, very thin) and stuck the pieces carefully in place.  I then trimmed off the surplus tape.  The fine cracks will fill in perfectly if you want to put a coat of paint over it.  I am not even bothering to do that - they really are not visible when its on the ceiling.  When I come to stick the rose in place I will remove the other covering from the tape and the exposed double sided tape will help in the process of sticking the rose to the ceiling.

Moral of the story is don't bin something in a temper (as I nearly did) put it aside for a while and see if you can find a solution.

Saturday, 22 October 2016

Adding details - the Hive

I had quite few bits and pieces to add to this room as well as all its furnishings and it is pretty much finished but I am saving photos of the rooms as a whole until I am happy they really are complete and the small people have moved in.

Meanwhile here's what I added to the space.

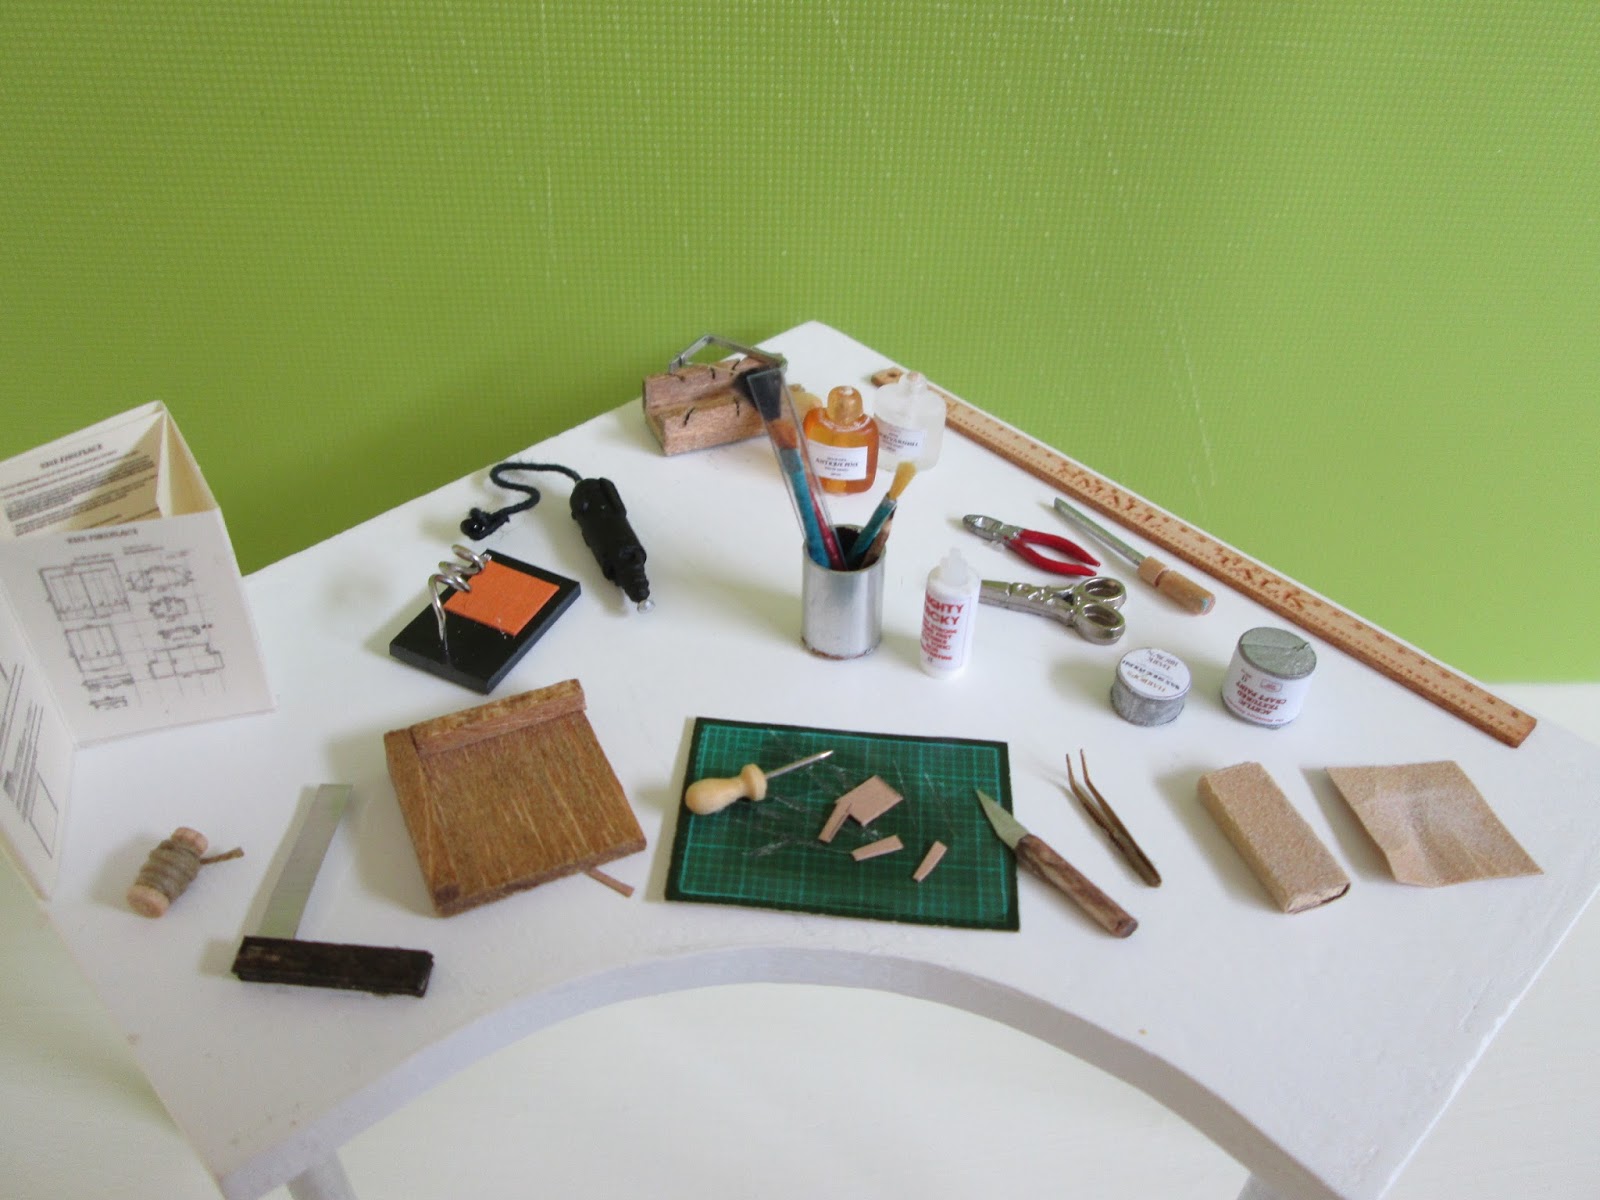
Jane Harrop does a lovely kit for anyone who wants their tiny people to have the same hobby as themselves:


You get everything you see here.  I already had my work table but the rest of the pieces are lovely.  So easy to make up, such clear instructions genuinely - all round good fun to do!

144th dolls house 
Even the teeny windows and doors were a cinch to get in place.  The dolls house front comes off along with the front section of the roof. I may well return to this some day and have a go at decorating it.
lovely set of tools

I think the saw is just genius thinking on Jane's part.  The block at the front is a mitre block but you are seeing it before it was stained and the cutting slits added - apologies.


Again some inspired thinking with the two parts needed to make the tacky glue bottle - just brilliant stuff.


wallpaper and flooring

I varnished the floor paper and made grooves with a knife so it looks like the sheets of wooden flooring I use.  I also made the box to stand the stuff in from Jane's very nice (folder) packaging - thanks Jane.

made another box for the offcuts

The trolley is started

The cardboard box, newspaper and the books you see here on the trolley are also in Jane's kit.


work table

This is my Ikea work table in miniature; full of Jane's things and a couple of other items.  My Elizabeth will be making furniture when I can find some 144ths for her, meanwhile she appears to be making a cardboard table????  Soldering iron seems to be missing???!!


Monday, 17 August 2015

Finishes and finished

My final decision on what finish to use on the ELF furniture was to use one coat of Danish Oil.  My thinking being: if one liberal coat didn't look enough then, fine, I could always add another...

I loved the way it looked after it was buffed up. I actually used my not-Dremel rotary tool for the polishing and think it made a real difference - it is much beefier than doing it by hand.


When I came to make the things for my work room I wanted them to look like the bog-standard 'contiplas' sort of thing that you get in cheap Ikea flat pack stuff. (this is what my real ones are)

I thought if I constructed them and then tried to apply several coats of paint and rub down in between I was going to struggle with the 'joins'.  

I did pre-assemble the Expedit (bookcase type thing) piece because that was so dependent on getting things in grooves and I didn't want those impeded in any way by paint.  However, I was right in that it made the painting/sanding process more of a challenge.

The desk and table pieces were all painted first:

starting to assemble them

They were assembled using my favourite DeLuxe glue which really does glue painted surfaces together.  I add a couple of blobs of Super-Glue gel on every join, just to lock the pieces in place while the other glue dried.  This also helps to keep everything squared up properly.


I did four coats of paint, followed by buffing and they look the part.  this time I did the buffing by hand - the rotary tool was too hefty for the paintwork.  To get a slight sheen on painted tings you just need the finest of fine abrasive as the last rubbing down process.  A scrumpled brown paper bag, or scrumpled computer paper, a piece of kitchen roll, a coarse piece of cotton fabric, whatever you can bring to it that has enough fibres in it to act like the finest of sanders.

Expedit - the castors work

my work table - bit of a 'nip' on the side but it is now fixed

computer trolley - keyboard tray slides in and out and the castors work

I know all these were bespoke but they are incredibly inexpensive and I get just what I want.  Bookmark ELF there will be a time you need her magic.