Saturday 29 August 2015

Keep instructions

This is hardly a tip, even for a newbie, but it may serve as a reminder.....

Never put away a kit without its instructions.

This little book stand came free with my Dolls House & Miniature Scene magazine ages ago and was added to the 'stack' of things-to-do-sometime.  There are no instructions on it and I am assuming the instructions were probably in the magazine.  I don't keep them.


five pieces


You may think such a simple little thing wouldn't be a huge a challenge - and it sort of wasn't - but there was an initial moment when I had the five little pieces jumbled up that I thought - I have no idea what goes where.  I was reminded to always, but always, make sure kits are put away with their instructions.


Friday 28 August 2015

Post Script to cutting wood

Just to prove that if you are reading my stuff it is only a starting place for anyone never having done anything like it before.  I don't have any right way to do something - only the ways I've found.  Here is a prime example.  After sharing my way to cut-wood-the-same-size method with you I immediately switched to doing it this way:


the flat method

The stop piece and the wood are now lying down flat and I have switched to a junior hacksaw.  This melded into method three - the stop piece still in this position (also note the G-clamp is now holding it down) but the strip was stood back up again.


So, the instructions are....   get a saw, somewhere to use it, a spare bit of wood and fiddle around until you find the easiest way for you.  Method three worked the best for me and I did forty-eight pieces in one standing.

Result:

89 great library shelf fillers

Love 'em.


Thursday 27 August 2015

Cutting pieces of wood the same size.

I am not daft enough to think I have invented this method but as I have never been taught anything wood-worky I have no idea what the idea is called?

I started by cutting my pieces of balsa for the books by measuring and marking up each one then I came up with this notion.


Work out where your piece of wood comes to when it is in the block and then clamp another piece of wood to butt up to it.


From then on all you have to do is slide the wood, you want to cut, up to the stopping place made by the clamped piece and you will always have the same desired length.


Wednesday 26 August 2015

Frugality is a virtue

It may not seem like it sometimes, but I promise you I am working this hobby on a very tight budget (pension and tiny bits from writing) which also has to stretch to many other things besides minis.  I am, therefore, cheap/tight/miserly/skimpy (choose your adjective) when it comes to buying anything where I can cut a corner. In truth, I like to think that even if I was 'rolling in it' I would be frugal.

On which note here's today's bargains:

I seem to have demolished a few paintbrushes recently - one is covered in dried glue and staring at me right now!  This packet of fifteen (to ruin) cost £1.49 


Colouring in the edges of the book covers means I need two or three felt tips which I don't have.  These may  well do the job for 59 pence.  I can see a blue and brown and green that may work.  I think the orangey/red I need may be a 'challenge'.


Tuesday 25 August 2015

Mini Mundus Books kit

Prompted by my recent acquisition of Ken Blythe's lovely books I decided to have a crack at the Mini Mundus kit which I bought.  Here's the safety warning:  These books will not be as lovely as Ken Blythe's but at under 26p per book and the 'fun' of doing them they are astonishingly good library shelf fillers.

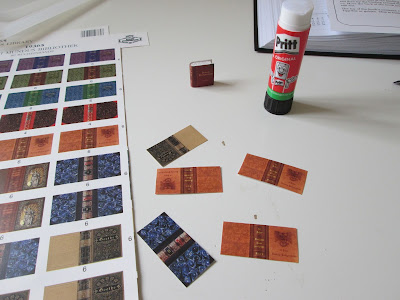
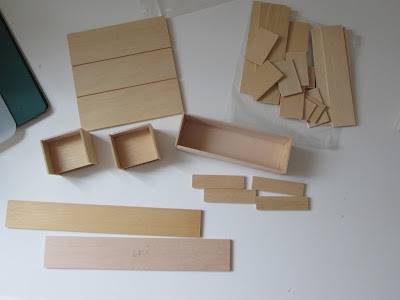
In the kit you get two pages of semi-glossy very nicely printed book covers on a stiff good quality paper and seven pieces of balsa wood with a rounded edge.


thicker pieces

There are two strips narrower than the other five, making two thicknesses of books.  All the books are the same height but the instructions do say say, cut the covers and the wood smaller if you want to vary them.  I think that would be a shame as they are well printed and I wouldn't want to cut into the bindings.  I think your shelves could be varied with other books from elsewhere.  


Indeed, if you are filling a formal library - old books were in limited sizes as they seemed to work within the constraints of folio. quarto, sexto etc, so it is fine to have a lot of the same size books, just different thicknesses.

The thinner wood can be cut with a knife but the thicker balsa really needs a saw. Preferably one with finer teeth than mine.  Balsa is a pig for 'fluffy' edges.

sander of choice

You can knock these off though with a bit of buffing.


Next, you need to finish of the page edges.  Don't use a very white paint as I did here - much to bright - grey(ish) is better.  I am gold-edging with my most favourite gold leaf pen by Krylon.

white acrylic

gold leaf edges

Since taking all the photos I have improved the look by drawing oodles of pencil lines across these areas to denote pages.  Much better finish.

Cut out the book covers carefully.  Don't wobble and don't leave any small white edges of the surrounding paper - they will show.

careful cutting

After making the first one I realised how much better it would be to colour in the cut edge itself as it shows white against the cover.  As you are also cutting the pages slightly smaller than the cover (as books are) you also need to colour in just inside the edges of the cover.  As always with these things go look at a real object before you start - Did I do that? No, why would I, I know what a book looks like!!  Mmmmmm.....


colour in a band around the inside edge and colour the cut itself
Then it is just a case of choosing your favourite paper glue - the kit encloses a Pritt stick - and carefully wrapping the block.  Takes a bit of practice to get it centred properly in all directions if you are fussy.

Et voila! a book...


This is one where I coloured in the inside edges after the event, so its not spot on.

I am now even making a 'crease' where the book opens - really potty for a pile of books going in a bookcase.  Hey ho... what can you do with Crazy Woman?


5 down 84 to go

PS:  Being made by Mini Mundus the books are in German.  If you can't script in why this should be so then do as I am doing, ignore it!  You have to get up close and very personal to discover that.


Sunday 23 August 2015

For nutty people's eyes only

When working on a project I have to have a narrative in my head to know what to put in the house and why - it isn't just a random collection of items that catch my eye.  Normally I pretty much keep this to myself and this one is beginning to form up.  

So, if you are as batty as me, take a look at the links above this post (Narrative etc) and you will discover what I know so far about the whole structure of the house and who lives there.

Warning at this stage it does seem to change every five minutes.

Gentle reminder:  If you subscribe by email you need to click on the title of this post so you can see the proper blog and the links.

Saturday 22 August 2015

Ken Blythe - more books

Having been away for a while two parcels were waiting for me on my return.  

The first was some coving from Jennifer's of Walsall which was to complete an order.  They are great - if something you order is temporarily out of stock they will always send it on as soon as they restock at their expense...... and usually quickly.  So in this case there was a great cardboard tube - imagine the cost of that plus postage - containing half a dozen pieces of coving.  Excellent - tick!

The second was delivered to me today by a neighbour, who had taken it in during our absence.  I wonder what they made of the little label on the front declaring doll's house miniatures.  Even the real life package from Ken Blythe is as neat as a pin and so carefully wrapped:


Inside one half was the most perfectly scaled carton of books:


Every book has printed pages - they look and feel lovely 


I won three items from his eBay sales which he kindly held on to until the bidding was over to consolidate into one parcel.  So, in the other half of the box were two other packages.  The first was a set of  Anne of Green Gables books.  Joanne has been given them for her birthday - they are a 1930's (?) edition and are very collectible.  They were favourite childhood books for her (and Elizabeth) and me!


The single book is the Rubaiyat of Omar Khayyam.  This book was chosen by Elizabeth as her prize for a writing competition at school many years before before and is still among her favourite reading.  

As this is how I also came by it I wonder if I could get my head mistress to (mini) sign the frontispiece .....  as she did fifty-five years ago.  She'd be ninety now!  How did the youngest head teacher of a grammar school become an old lady?  A million memories from the sight of a tiny book.

mine was red

where's the prize label?

think I'll read the full-size version


Monday 17 August 2015

Finishes and finished

My final decision on what finish to use on the ELF furniture was to use one coat of Danish Oil.  My thinking being: if one liberal coat didn't look enough then, fine, I could always add another...

I loved the way it looked after it was buffed up. I actually used my not-Dremel rotary tool for the polishing and think it made a real difference - it is much beefier than doing it by hand.


When I came to make the things for my work room I wanted them to look like the bog-standard 'contiplas' sort of thing that you get in cheap Ikea flat pack stuff. (this is what my real ones are)

I thought if I constructed them and then tried to apply several coats of paint and rub down in between I was going to struggle with the 'joins'.  

I did pre-assemble the Expedit (bookcase type thing) piece because that was so dependent on getting things in grooves and I didn't want those impeded in any way by paint.  However, I was right in that it made the painting/sanding process more of a challenge.

The desk and table pieces were all painted first:

starting to assemble them

They were assembled using my favourite DeLuxe glue which really does glue painted surfaces together.  I add a couple of blobs of Super-Glue gel on every join, just to lock the pieces in place while the other glue dried.  This also helps to keep everything squared up properly.


I did four coats of paint, followed by buffing and they look the part.  this time I did the buffing by hand - the rotary tool was too hefty for the paintwork.  To get a slight sheen on painted tings you just need the finest of fine abrasive as the last rubbing down process.  A scrumpled brown paper bag, or scrumpled computer paper, a piece of kitchen roll, a coarse piece of cotton fabric, whatever you can bring to it that has enough fibres in it to act like the finest of sanders.

Expedit - the castors work

my work table - bit of a 'nip' on the side but it is now fixed

computer trolley - keyboard tray slides in and out and the castors work

I know all these were bespoke but they are incredibly inexpensive and I get just what I want.  Bookmark ELF there will be a time you need her magic.


Sunday 16 August 2015

Swan Song?

This might be my swan song.... at least for a while.  To explain.

We spend each winter in Naples in Florida where I can't work on my project as we are separated by 4,360 miles!  This year we are going back early so I can go to Miniaturia (yes, that is how they spell it) in Orlando on the way in.  This means we leave in three weeks time.   We are on holiday in Scotland for eight days during those three weeks and have a zillion commitments after that so, realistically, this is my last week of being able to 'play house'.

I am writing this on the 8th July, but have forward posted it to the 16th so I can keep this blog going as long as possible.

Don't desert me.  I will do my best to nip in now and then with mini-related tales and the moment I am back home I will be back in the game.

Meanwhile, look what arrived a moment ago from ELF.  It probably isn't thrilling for you but I am doing little cartwheels.


my life in mini

Along with my 'replica' furniture Elizabeth sent the usual time-consuming (for her) two pages of instructions on how to put them together.  When I tell you the work table cost just £5 you can tell what a star she is.


The Ikea trolley complete with drawer fronts and working castors.


The work table.  Love the absolutely just right legs.  Might need a couple of small chests of drawers to go under it sometime....  


My computer trolley - not just her stock offering but bespoke, design and measurements.  Complete with sliding keyboard tray and castors.


Much painting to be done.

I discovered when I made my first kitchen that you need to apply as many thin coats of paint as you can stand to do.  I am sure Elizabeth once told me when she makes for customers she does nine!  I am fine doing the painting and even the sanding between coats; what I am rubbish at is waiting for it to dry properly in between.  I intend to do my very best with these and give them at least three.  I'll keep you posted. 


Saturday 15 August 2015

What finish for the wood?

waiting for its finish


For the two Elf pieces I have been making I wanted them to pretty much stay as they are - in light wood.  That doesn't really mean unfinished though; 'raw' wood somehow looks just like that and cries out for something.


Many people use liquid wax which brushes on, is left to dry and is buffed to a slight sheen.  It looks lovely.  I have only tried to do it once and I suspect my impatience overcame me and I didn't leave it long enough to dry - basically it made no impact on the furniture I used it on.  My bad.  I binned the wax!

Not wanting to invest in more I wondered what Danish Oil would do as I have some of that.


six choices

Imagine these colours a little darker!  


Top row left to right Danish Oil - one coat, two coats, three coats.
Row below water-based clear satin finish.

I did the oil and decided I was not sure about the way it brought out the grain.  I think it is rather too defined and I am concerned I have all sorts of grains going every which way on the finished pieces.  It also darkens the wood which, on the one hand warms it up but on the other, it loses that 'blonde' look.

That drove me to trying the satin finish which doesn't change the colour very much or open the grain too much but it does leave a slight 'varnishy' sheen that's not right for these (?).

I am totally stumped and can't decide for more than two seconds at a time which one I am going with.

peep-o

This is a handy way to look at colours of paint, fabric etc.  You need to isolate them from the distraction of their background and other samples nearby.  Make a 'window' in a piece of white paper and look at them through that - useful when looking at paint chip cards.


If you have an opinion on which to choose, please share it - it is moments like this I hate working in isolation.  I want someone to tell me which one...........

Here's the TV unit waiting for its TV (I have one) once the unit has been oiled or varnished.


Friday 14 August 2015

Adding handles


drawer front for scale

I love these handles from ELF.  I just bought four small, four medium and four large for the princely sum of £1.80; as you can deduce they cost pennies.  I wasn't sure what I wanted to use for the desk unit.

I chose the small ones, liked them so much I decided to add the medium ones to the TV unit which is what you see below.


3 plus one pieces of kit to fit a handle

To set in most drawer handles and knobs you need -


Ruler - seems to be the invisible variety - steel is best for everything.

Bodger - I also add in to the mix a broken stylus - the thing crafters use to shape paper; it has a ball on it. The ball broke off and left me with a really useful pointy bodger.  (bradawl?).  use large needle, small drill anything to make a starting hole for your drill so you start in just the right place.

Pencil - cheap propelling pencil is the way to go for all measuring as it has a really fine point.

Drill - any drill - I do like this little hand one for small jobs.  I have shoved the drill bit all the way in to where I want to drill up to.  Are you supposed to do that?  No idea - works for me.

Template - The plus one piece of kit is the paper template lying on top of the bottom drawer.  I make a template of the drawer front, fold it in half, mark where the handle needs to be, relative to the sides.  I then place the paper carefully on the drawer making sure the bottom edges are smack on, then mark on the wood where I need to drill.  Remove the paper and (in this case) make two holes.

make them match

Elizabeth clearly worked out a certain length to the bars that go in relative to the thickness of the wood.  Basically if you drill right through, put the drawer flat on a table and push in the handles right through to the table they look just right.  If you want something different and want to be sure they all stick out the same amount you need to find something of the right thickness and put underneath as you press the handles in place.  I was happy with Elizabeth's 1/8th gap for the little folk to get their fingers in.


Thursday 13 August 2015

Finessing the piece

Here's a couple of things to ponder when building something....


making things match

Some furniture needs various plinths and tops that need a little overhang.  It is relatively easy to judge by eye - but why risk it.  If  you have a box of cut off bits of wood or card it is most likely you have something the right thickness to make sure each side is exactly the same.  Just shove it alongside the edge of whatever you are using to square up the parts and the top will be that much away from the edge - do the same on the other side and any other matching pieces and you'll get uniformity without hassle.


sharp edges and corners

The edges and corners on a finished piece sometimes look to sharp for a piece of furniture.  Other than a deliberate style statement, most furniture has the edges of the wood 'knocked off' a little just to take of the splintery sharpness.  Some furniture also has slightly knocked off corners.


hope you can see the difference.

On this particular furniture I am happy to 'overdo' it a little as that is my memory of eighties stuff which is what I want these to look like.  The furniture for the rec room has come from Elizabeth's London flat which she has just sold - all retro furniture (just wait until you see the chairs!).


Wednesday 12 August 2015

Distraction

Do you get as easily distracted as I do?

I was waiting from something to glue up enough to handle - just a couple of minutes and my brain and eyes wandered off to the forward edges of my house's rooms.

In all three previous builds I finished the front edges of the project almost at the very end, just before I hung the large dolls house doors.  Looking at it I wondered why and thought it might be nice to do it now.  Did the thought stop there and I returned to making some furniture.  Well, no.  

I wanted the usual cream coloured finish that I have done them in but then realised I had a tin of paint which was no longer needed - now we aren't Georgian - so I thought I'd give it a whirl.


rough edge

lightly sanded and painted (first coat)

Oddly in this photo the side of the house seems to have ended up matching the paint.  It doesn't really.  The paint is close to the colour of the unfinished MDF and I quite like that.  You can see the difference as the vertical edge is painted and the horizontal one is not. 

Tuesday 11 August 2015

In process

Thought you might like to see two ELF pieces in process.


From pieces being turned into boxes ....

.... to almost finished TV unit

Today's kit is the computer desk with hutch:


Much faster to do as it is very similar to the TV unit

I thought it might be useful to show you this to also show you all the things you need to make it.  You can manage with less - basically all you need is glue!


These are the things I like to use when building stuff.  Firstly there is a magnetic right-angled jig which I think gives me greater accuracy and speeds up the process quite a lot - not essential, but it is very useful for a zillion things.  They come in lots of sizes - this is a small one because I bought it for 1/48ths.  I haven't found I need a larger one yet.

There is a very small and thin palette knife (cheap) just to tweak the glued object off the jig if it is sticking a bit.  Oddest thing here are the 'marks' on the knife - it is a clean as a whistle - assume they are reflections but I can't figure out what?????

The wood glue goes on a glass tile (any tile will do, or a small plate or saucer) - small blob at a time and is picked up and applied to the kit with a toothpick.  Your tile/plate etc will clean up easily when it gets too much glue or paint on it.  Most of it peels off and the rest will soak off.

The two rough-looking wooden pieces bottom right are just bits of wood that I use as spacers between the shelves to make sure each side of the unit matches and even more importantly, to make sure the shelves are horizontal.  It drives me nuts if  I put up a shelf on the wall or in some furniture and it is wonky - however slightly.  Same with hanging pictures - real life and mini life.