Showing posts with label Furniture kits. Show all posts

Sunday, 9 February 2020

How to..... make up HOM kits

This post is a bit of a shoo-in following some conversations on a Facebook Group I like for House of Miniatures furniture, so it won't be of general interest but it is part of my 'diary' for this build.  So apologies for folk who want to see how the actual Dalton project is progressing but I hope it helps a couple of people I have been talking to about making up HOM kits. (Facebook link: Chippendale Miniatures/House of Miniatures)


************************************************************************


As always let's begin with the caveat - this is not an absolue how to make up HOM kits so much as how I make up HOM kits.  There must be as many methods out there as there are folks doing it, BUT, for newbies, this might give them a place to start until they find their very own method.

It is also intended as a general guide so nothing is specific to the piece I am making. (My second huntboard)

First..... what equipment will you need to make up the kit?

Glue

If you use any pva white glue you will have problems if any gets on to your furniture where you don't want it - you can not stain over it.  Some people stain their pieces first and then glue - I have done this but I know the joints are not rock solid.  That's probably OK if stuff isn't going to be moved around much.

This glue is fabulous.  It gives you time to fiddle about before it sets, if any goes where it shouldn't it dries dark brown so it doesn't show and it fixes rock hard.  I always apply with a cocktail stick.  I use a glass tile but anything you like will do to put the glue on.  A tile or an old plate though is an excellent tool to have on your desk for glue and paint and all sorts and it will clean up like new. Mine has had six years hard wear.   Give it a bit of a soak in some a warm soapy water and a scrub or a scrape clean.


So you have your glue and you have checked you have all your pieces before starting.  If you buy unsealed boxes it is hugely exasperating to find something missing half way through a build.

Skip read through the instructions to give you a feel of what you are about to do but don't get bogged down or panicked by detail - all will become clear as you do the job.  

You might prefer to do things the right way and sand your pieces before assembly, I am all for shortcuts so I don't do mine until I am ready to stain.  Also I would argue these are very fine pieces and some have even finer detail and they won't take kindly to endless sanding without losing their lines.  

Carefully and slowly follow the instructions and do the assembly.  Try to line things up perfectly.  There are some strange angles on some pieces like splat backs on chairs for example and there is so much you won't be able to correct once your glue sets.


A right angled jig can help a lot when making mini furniture.  I invested in a small magnetic one right at the beginning of my sojourn into this game and have never regretted it one iota.  You can make a pretty decent one out of Lego and or just build one from wood - all of these will help you square stuff up nicely, but a magnetic one is the bees knees.  This little gem will keep things square and will also push and hold things in place while the glue sets up.  A quick Google search and I am seeing them for about £30 in the UK and $30 in the States (I got mine a bit cheaper than that at a show but it was six years ago!) 

Sanding

Don't panic at the sight of this lot - there is no way you need all of them but I am showing you the sort of stuff than might be useful and you could select from this depending on what you can find easily .


There are two buffers/files used in manicures - white top left and blue and green on the right.  The beige sandpaper at the bottom is 400 grade so it is very fine.  The two grey pieces on the top labelled FINE and SUPER FINE can be found in the decorating section of the hardware store as they are used by painters and are brilliant for our work.  


When I am doing these HOM kits I have out a piece of 80 grade sandpaper for large scale sanding; to make drawers fit for example, a piece of 400 grade sandpaper for general rubbing down before staining along with my most used sanding tool - the white sponge nail file/buffer.  Brilliant tool and cheap as chips.  Mine came from Dollar store but again if you Google them they are easily available even if you can't get out to a shop.  I commend them to you before all else.

So there are only three bits of sanding kit that I consider necessary.  


Here are some more alternatives in case you already have these - all good and useful mini sanding bits and bobs.  The Norton stuff also known as Abracast (I think) is good because it is washable and never wears out unlike sandpaper.  Another nail kit piece in pink, basically anything fine and on foam.  The sanding sticks I have only seen once at a show and they are sometimes handy for getting into nooks and crannies but I wouldn't really say seek them out.  Similarly with the assorted shaped files - I just got them because they were silly price at Aldi or somewhere.  I do use one or two of them now and then.

So...... you have now glued and assembled your piece of furniture and you have carefully sanded everywhere with the nail buffer to get the best possible surface for the stain and finish to go on.  Only tip I can think of here is to knock off the edges a little to make it more realistic.  If you look at your own furniture you won't see an absolute ninety degree right angle sharp edge - they are all very slightly rounded off.  Don't over do this - just a couple of passes at about forty five degrees and with a curving motion and the sharpness will disappear.  


Use a large soft brush and lint free cloth to ensure you have been meticulous about removing the sanding dust - no good preparing a lovely silky surface for the stain only to lock in heaps of very fine sawdust.


Stains

I have gone through too many kinds of stains to even begin to remember them ....  from Minwax pens to tins of spirit based household woodstain .....  and many, many more.  Then I found these and I absolutely love them.  I confess to having put all three in a small glass jar and mixed them together.  I have ended up with what I wanted which is a 'mahogany' type colour with enough depth to cover the wood.

They pretty much go on like painting with acrylics and are water based so soap and water means an easy clean up of your brushes and you.  They dry overnight and don't stink.  Win, win, win.

There are loads of gel wood stains but I haven't ventured into trying another make as I was happy enough with these and the three have lasted me years; but if these prove difficult for you to get it might be worth a shot at another make.


OK, Gluing/assembly, sanding, first coat of stain all done...... here comes the hardest bit of the whole process for me.   Heaps of patience.


Leave as long as you can, at least until the next day, you want the stain to have completely dried out to allow the wood to shrink back to its absolutely dry state.

If you run your fingers over the wood at this stage you will discover it is slightly rough again.  When you paint or stain wood the moisture raises some of the wood fibres - nibs - so after any first coat of painting or staining you need to repeat the sanding process to denib the wood.  At this point you almost feel as though you are going backwards in your build but it is probably the most necessary step for any kind of decent finish - at this scale all those nibs will show in the end result.    


If you look at this picture closely you can see why I said it feels like going backwards.  The top three drawer fronts seem to be all nicely stained and then I go and sand them again (see the two other pieces) so they actually look worse.  They may look worse but they feel a whole lot better.  If your fingertips won't tell you the difference (my husband's don't for example) go across them with something like a cotton wool bud and see how it snags on the wood compared to how it passes over after you have sanded it.  The brush in the picture is just to show you the large soft brush I use to clean off the dust .... followed by fingers and a cloth.

Off you go now to do the second coat.  

After that the choice is yours - use your best judgement to see if it needs denibbing and be sure you have a nice even coverage.  You may be fine with just the two.

I do a sort of very slight sanding by giving it a good rub down with a scrumpled tissue.  All paper has wood fibres in it so even soft toilet paper and tissues are micro rough and it will smooth the surface nicely. (message to your nose and botty)


Finishing

Ah, here is the stumbling block in my How-to.  This is still a work in progress with me I haven't yet found the perfect top coat.  The main tip here is that you don't want to use anything gloss in a dollhouse.  Be aware that everything is 1/12th even the amount of shine on something 😊 a satin finish will give you the miniature equivalent of a glossy shine on your furniture and painted wood.

I have tried a gazillion different 'varnishes' from small pots of various artists' acrylics through to tins of household finishes and am not happy with any of them.  The closest I got was a satin B & Q quick dry interior wood finish so something like that might be worth a go for you.  The issue I had was that it always seemed to have a certain amount of visible brush strokes in the finish; I couldn't get it perfectly flat.  I know some folks spray their final finish and that too might be worth considering.

I have tried all kinds of waxes for wood and even shoe polish and furniture polish - they will all give you a reasonable finish  but are a bit of hard work as you will have to do several goes at it.

Currently I am using this.... 


I don't think it is my final solution as it is not quite shiny enough.


I apply this generously with a brush and leave about an hour and then wipe off the surplus  I then do the same again and finally buff it.  It will give a slight sheen and a smooth surface.  Again if you want to try this I assume any oil wood polish will do.  I am just researching Tung Oil for my next piece, so watch this space.

--------------------------------------------------------------------------

PS:  This is my happy place for painted, stained stinky hands, it totally fixes that.  


PPS:  24 hours later and this is what I did  😱 


I thought I would try adding some varnish.... it went into a gloop that I tried to rub off quickly before it dried..........well that's a case of start again if ever I saw one.

In the wild hope that someone is reading this who has definitely conquered the glaze element of these builds PLEASE let us know here.  Until then ...............

PPPS:  .... will it never end..... I just got quite a nice sheen using a 50:50 mix of gel stain and acrylic varnish.  My actual mix was made up of three colours of Americana Gel stain (see above in the post) and the shiny bit was a mix of Delta Ceramcoat Satin and Gloss Varnish - so a bit of a complicated recipe to follow but it might be worth worth trying equal parts of any water-based gel stain and a water-based gloss of choice.  (NB: you can not mix water based things with solvent/spirit based things - set off on one path and follow it through)


Friday, 7 February 2020

Oh dear

In my last post I  left you in suspense as to what I might have ordered from Proops Brothers.........


As Violet Elizabeth would say, "I'll scream and scream until I am sick"

I know you are fed up hearing about the window saga but I really thought I had it sorted. I am struggling to cut up my gazillion strips of wood that I need to make the frames.  They are only one eighth of an inch square but absolutely solid.  Knives won't do it and the saw is slow and often splits the back of them - they are really too small to try to make a cut on the opposite side each time to help avoid this.

So, I ordered this .....


..... a little guillotine meant to cut strips of wood and plastic..... I watched the youtube and everything!  It chomped through strips of wood and bits of plastic but on my window frames it barely makes a dent. 

....... but well done to the company, not the slightest quibble about a post paid return/refund.  That is impressive these days.

Just so I leave you with a little up rather than down here is what I made whilst waiting for it to arrive.

Duncan Phyfe window seat circa 1810-1820


I am a great believer in placing something to the front and centre of each room and love the challenge of finding something appropriate but nothing that will prevent us looking into the room easily when we open the front of the house.  When I am making these little worlds I do imagine myself into the rooms to see if they actually work - can I walk round them easily?  is it a room my subjects could live with and have a life in?  with this in mind it would clearly be a nonsense to have a whole side of a room without anything there (our fourth wall).  Hence the challenge.  

This  seat will do the job nicely in my music room.

Friday, 31 January 2020

House of Miniatures Cellarette (plus windows)


As I have thirteen windows still to do, and I am not really enjoying it, I decided the best approach was do do one floor at a time and then take a break and make up one of the kits that I have waiting for the house.  Well, I managed to do three out of the ten parts needed to complete the top floor of the house before getting fed up and turning to a kit.


Windows
Make paper template for half a window


Cut out (at least) ten for the top floor windows.


Dry fit... one will go on outside window at the top.....


one will go on inside window at the bottom


This is the glue I use for fixing windows.  You need very little, it is super strong and dries absolutely clear if some does 'escape'. 


I managed to complete three half (inner) windows before I got hugely bored.  Pretty ugly right now but they will have window sills added.  I did buy a ton of trims to go around the windows and the realised I would cover them all with curtains so it seems a bit pointless.  Every time I come up with one of these brain waves I discover it has a knock on effect which then creates more jobs.


The Cellarette
Here is the delightful House of Miniatures Hepplewhite cellarette


Check all the parts are there


I have discovered a jolly good glue for any wood that will have a dark finish.  If you stain parts and then glue it doesn't always make for a good strong joint.  If you glue and then stain (my preferred method) you have to be super careful with the glue as the stain will not cover any areas that have the slightest bit of glue on it.  As you can see this is a tinted glue which purports to solve that problem in that the glue will be brown and so not show as a bare patch.


There was a momentary panic when I realised the glue was a silly wishy washy pale colour when it left the pot (see top right blob).  This was soon allayed; as you can see it dries pretty much mahogany coloured.


I had a real issue with the stupid hinges for the lid.  They are teeny tiny and the screws almost microscopic so I realised I was on a challenge with them. 

It began with being instructed to cut out 1/32th inch (!!!!)  grooves to take the hinges in the lid and in the back edge of the box.  Much fiddling around with a couple of different shaped Xacto knives and it was done - not a work of art - but done.  The instructions also stated that the hinges were to be flush with the back of the box, not sticking out.  I spent a jolly half hour screwing the hinges to the lid - four teeny tiny drill holes to give the teenier tinier screws a purchase hole and then moved on to the back of the box.  Quelle horreur! the wood wasn't thick enough to allow me to screw the hinges in.


Three options as far as I could see.  (1) Remove the hinges and make a pair out of ribbon or leather strips, (2) glue a thin batten of wood to the inside top edge to make it wider, (3) set the hinges back so the actual hinge part was outside the box. 

Seemed a shame to go for option one when I had these cute little hinges, if I did option two there was a possibility the screws would land almost between the proper wood and the added batten and wouldn't hold well enough so it looked like option three.

I unscrewed the hinges from the lid, reset it in the new position and put the screws back in...... that was tons and tons of fiddling about and superglue came into play as the wood just wants to splinter here there and everywhere.  This basswood behaves remarkably like balsa.  I then fixed the other half of the hinge in the back of the box which is just about thick enough to allow the screws in without splaying out and splitting every which way too much ....more superglue help here.  OK, I had a fastening - not very good looking by now but probably the best of a bad job.  I closed the box and thought there was movement, this was confirmed when I lifted the lid and the hinges just pulled away, breaking out of the wood and glue easily.

I cut the hinges in half and reglued each half to the original place best I could and made an actual fastening 'hinge' across the back (inside) from a piece of gauze ribbon which has taken the woodstain very well and barely shows.

Here is the built piece.  There is a drawer for any drink implements you might need - wine coasters, corkscrew etc.  There is also a sweet pull out tray at the top for you to stand your glass on when you are pouring the drink.  The internal cabinet measurement is about an inch so it is possible for it to contain wine though this one, for this period, was much more likely to contain 'digestifs' such as fortified wine, brandy, liqueurs etc for the gentlemen after dinner.


 This shows the first staining.  I now use gel stain and am very happy with it.  It goes on nicely, not smelly and is water based so makes for an easy clean up.  I did a fine sanding and a second coat the next day and decided that was enough.


 I always struggle to find a successful top coat to give a subtle polished wood sheen and have used many different silk/gloss products including various acrylic forms and wood finishing varnishes.  They all have varying degree of success.  In the main they don't go on smoothly enough and don't lend themselves to rubbing down and doing a second coat.  I thought I would have a go with this.  I suppose any similar oil would do - we just have this in our real life cleaning cupboard for some natural oak furniture.


It did an OK job; no worse than the other things and at least there are no lumps and bumps with this.  I may add some brown shoe polish some time - we don't have any right now.


I was hugely lucky a couple of years ago to come across these transfers.  They are made for this cellarette.  Basically in England the piece of furniture would have remained plain but the ones in America often sported fine inlay - especially Southern furniture.  I imagine this was to differentiate itself from the English.  By the time of this piece in 1790 the Americas had only just begun to recover from the revolution and, I imagine, were determined to eschew all things English; or, at least, to make it their own.


Sadly, I soon discovered this was a skill beyond me.  I tried just one tiny transfer and gave up.  


Thursday, 14 March 2019

Adding even more ELF to the premises

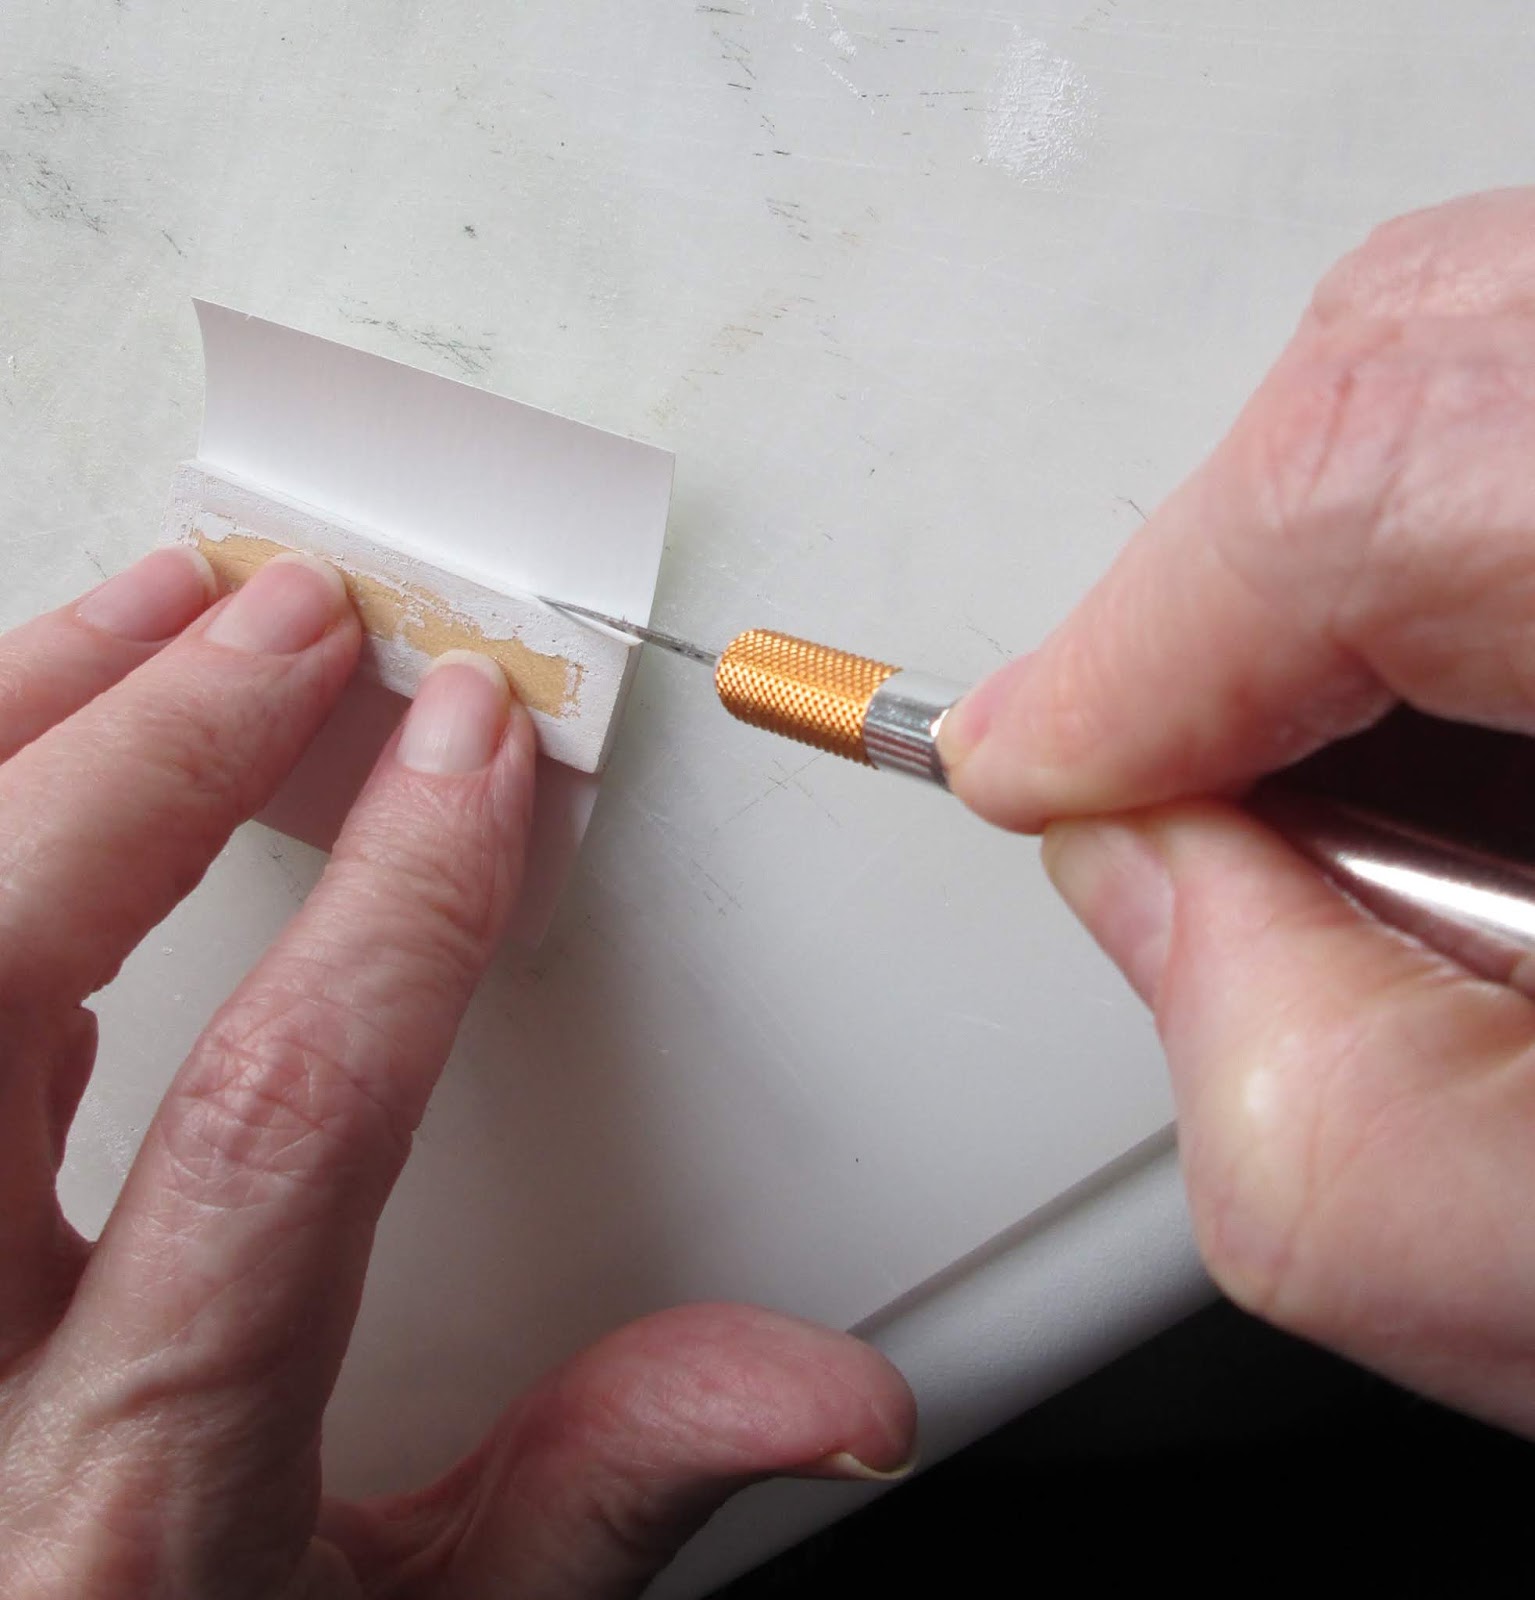
Steel splash-back - Adding the splash-back was pretty straightforward - I did have to do a bit of trimming to fit but that is easy.  Just score a line several times with a sharp fine knife (scalpel bladed craft-knife) and then carefully fold back along the groove and the metal will snap cleanly where you want it to.


Media centre with TV. - This was an easy build after having done so many of ELF's 'Eazy' kits.  Start by sorting out which pieces need painting and how much; get that prep done.


This kit has a lot of Fablon covering so most of it needed an acrylic base-coat to give it a good surface for the glue to adhere to.  It isn't at all happy sticking to the bare wood.


Leave to dry overnight if you can.  Rub down very thoroughly and carefully with the finest 'sander' you can - I use a painter/plasterers grade which is extremely fine- bit like a rough cloth - you can see a piece of it in the photo.  Equally importantly, clean off all the dust.  It is essential the piece of wood is silky smooth and dust free if you want a good finish and good adhesion.


There are excellent instructions for using the Fablon in the Eazy kit instruction manual from ELF but here's how I do it.  Firstly cut a piece of Fablon large enough to wrap around the area you want covered and stick the face down that you want to cover.  I then make sure that it is pressed down as neatly and firmly as possible.  I usually 'roll' it across the rounded edge of my work surface.


Trim off the excess from the side which will not be covered, with a knife or small pair of scissors


I then lay it down and firmly score a line along its first folded edge.  You don't have to do this but you will find that when you wrap it round, however firmly you press it in place, you will get rounded edges rather than sharp squared off ones.  Scoring the line is not an exact science and you may want to practice on your cut off waste pieces first until you know how much pressure to apply - too much and you may cut through the plastic, too little and you wan't make any impact.


Fold over very, very firmly pressing along the outer edge and side


Do the same scoring along the next fold you will want to make to complete the edges.  


Cut off the excess material. These are the drawers and you need enough folded over to grip to the back of the piece but leaving as much wood exposed as possible to ensure a good area for gluing the drawer front to the wood behind.


When the piece is wrapped, work over all the surfaces with something clean and very smooth - this is the handle of my Xacto knife.  press down firmly and check everything is smooth.


You should end up with nice neat, sharp edges.


I recently wrote a post saying I only use three glues....  BUT..... I had forgotten this one.  It does what it says - glues and glazes - so in the main I use it for sticking in the window glazing because, worst case scenario, any glue which could be seen dries clear and is therefore nigh on invisible.   BUT it is also useful for gluing plastic of any sort to any other material.  PVA never seems to be a firm and permanent fix for that - it leaves flexible joins.  This sets up just fine.  Again I am certain its a PVA base but it does smell different so I assume it has something else added.  Hope so at that price.  This will enable the Fablon areas to stick to each other and will also stick any Fablon areas to any wood sections if needed.


All pieces prepped I often lay them out in some sort of logical pattern to ensure I am attaching the right pieces to the right pieces.  I always do a dry fit before I start anything and sometimes write on each piece where it goes.


From the top - the lovely ready made plastic wall panel.  There was a huge panic moment when it arrived, the cut edges and the grooves looked as though they had loads of 'debris' remaining from the cutting and even the surface itself looked a bit scuffed up - I was astonished as ELF is so meticulous.  Thank heavens before I did anything about it, it suddenly occurred to me it might have a protective film over it ... which, of course, it did.   Peeled that off and, eh voila, a lovely piece of kit.


Next down is the Fablon covered top, then plain wood back, then two Fablon covered side panels, four Fablon covered drawers, the plain wood front that the drawers are stuck on and the bottom.


As you assemble make sure you check every piece and think which bits will be facing you when you look at your house - make sure you choose the best finished pieces to face you.  I am looking at the eight painted end edges on the drawers here to find the best ones as I will be viewing the media stand from the side and two of them will show.


All the Eazy kits go together in the same way - build a box from five pieces, add a top, making sure it is flush with the back and centered side to side properly.  It looks like a large overhang at the front but the drawers need to be glued in place and they use some of that space.


There is a bottom piece which raises the stand a little off the floor.  I was hoping for some short metal legs but don't think Elizabeth has any.  Just in case something does turn up I have just used double sided sticky tape to attach the the fillet to the base in case I want to remove it.  I will also put the media backing piece on the wall with mini-wax for the same reason.


with small stand in place


This shows the film that you need to peel off both sides of the resin wallboard.


Finally .......  all done.


 I love making these kits.


Erratum:  I cannot believe I did this; I wrapped the drawers on the unit the wrong way round.  I added the Fablon, wrapping the wood lengthways, covering the tops and bottom edges of the drawers, whereas they are meant to be wrapped side to side, so you have a nice finished edge where it shows.  I did a whole kitchen the right way and then somehow forgot when I got to this!  Apologies to ELF .....  so much for demonstrating my prowess with your kits.