Saturday, 9 February 2019

Purchases from Elf Miniatures

One of my favourite vendors that I return to time after time is Elf Miniatures.  They make lovely furniture and will do bespoke items for a really good price.  So, if like me, you don't have the sort of kit that allows you to cut wood for cupboards etc neatly and accurately this is your go-to place.

Right now there is a sale on as Elizabeth is cutting back on her not-made-by-her items.  It may be worth your looking, especially if you are doing a modern property.

I just snaffled these:


Desk and stool for the apartment.  I wanted something which takes up very little visual space as this will be sitting centre and front of the room as you look in - beneath the bay window in the roof.  It also makes real life sense in a smallish flat as it takes up very little space and the stool can be stowed underneath when not being used.


Tempted to let you try and figure out what this is.....  

It is a base board and mattress kit for the bed in the loft apartment along with a double duvet set kit complete with sand to fill the pillow case and duvet.  I have used sand in the past but it was a nightmare for leaking out of the cushions.  It is great for modelling realistic shapes but, as I said, a bit of a pain.  I prefer to use tiny micro balls.  That said they may not work hugely well with the duvet;  so, no decisions made yet.


Last but not least a boringly straightforward swivel mirror, but 'does what it says on the tin'. It is a better quality than this photo would imply.


Friday, 8 February 2019

How I fit a ceiling light

This is a post which the 'pros' among you can skip.  I do hear from the occasional newbie so I know this blog gets read by people new to the hobby or struggling with something for the first time and, though it is a detailed record for me about my project, it is also hopefully a help now and then for someone else.

So..... here is a very detailed account of putting in a ceiling light in Dalton House. 

This was probably not the least frustrating job to choose as my way back into the game.

My first challenge was actually reaching the top floor of the house!  It stands on a very useful Ikea, Kallax set of drawers with large trolley wheels added.  I am five feet six inches tall and the top of the roof is six feet from the ground.  Out came the little step stool...... then a bigger one.


When I opened the roof I discovered that one of my little visitors over Christmas had sneaked a body into the room and given her a book to read


So, yes, rather stating the obvious, if you are going to work on a ceiling light you could do with an empty room.  To minimise clear up just put down a tissue or piece of kitchen roll to catch the sawdust.


Locate where you want the light to be and then work out how to transfer that position to the floor above where you will be drilling the hole.  I often make a template of the ceiling, mark the position of the light and move that to the floor above, making sure it is in the right position allowing for various wall and trim thicknesses.  It is not as hard as it sounds as long as you line up the front edge of your template with the front edge of the floor and then just visually check that the thickness of side walls are allowed for.

On this occasion the position wasn't absolutely critical, so some careful measuring across the ceiling and then transferring that up top sufficed.

I used to have a right angle drill, sort of like the one in the photo - maybe not as posh/chunky  - but I decided in the move here that it was something I wouldn't use again, so it got given away.  It is super-useful when working between floors in a dolls house.  Luckily on the top deck I have all the space in the world to use any kind of drill.


If you can't snag one of these sort of kits on eBay for a good price there are small hand drills which will work in a confined space.  I can only suggest you google 'small hand drill' and find something like this that works for you.

Put the wire next to a drill bit and choose one that looks a little larger than the thickness of the wire. 


At last here comes the light.  The fan doesn't turn really but I thought my apartment dweller might find her bedroom very hot up there in the roof so she would be glad of the (pretendy) fan in the summer months.  Most lights come with a little two pin plug attached.  


If you are going to use a connecting strip like this one you will have to remove (or cut off the plug) to allow you to thread the wire through the hole in the ceiling.  Eventually, of course, you then have to re-attach the plug.  To remove the plug you need to use pliers (not teeth and cursing) to pull out the brass pins and then you can pull the wires free.  To put it back together it is a matter of putting the copper wire back in the holes and pushing the pins back in.  It is technically easy but, I find it pretty frustrating to do, especially if you are doing a lot of them.

Dolls house lighting connector


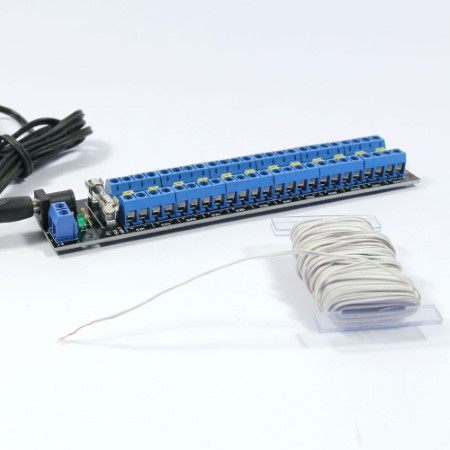
On my second project I decided to use this sort of connecting strip (photo below).  So much easier.  It is more compact and you can connect many more lights to the terminals.  It looks scary but I promise you it is much simpler.

I always bought mine from Small World Products.  They are now sold by:  Little House Plus

I will be writing a blog about gathering up all the wiring and attaching to the connecting strip and attaching the power supply when I get to do that but I am afraid that is probably a fair way off.  So if you are keen to get your lights attached to power before I do, the Little House Plus site can help you sort out how, or email me with any questions. 

Mix brick compound ready for application


Meanwhile back to this ceiling light installation.

Take time now to thoroughly straighten out the wire that has been bundled up for packaging.  Usually it will be lying in a groove in the floor above and needs to do that without any bumps and lumps under the future floor covering.  I lay it down carefully and cover with a strip of masking tape.  That stage is a bit further down the line but that's why you want the wire nice and flat and kink free.


If you have decided to cut your plug off you will need to expose the copper wires to test your light is working OK. Look carefully and you will see that the wire has a sort of groove down the centre.  Gently pull and you will see there are two lots of wire each coated in a plastic covering.  You may need to nip between the wires with something like nail scissors to get it started.


You then need to expose the copper wire.  If you are proposing to put in lots of lights (large project) or you know this won't be the only house you will ever do it is really wise to invest in this precision wire stripper.  It cuts the wires neatly and strips off the plastic covering without damaging the hair -like copper wires beneath.  Again, Little House Plus sells them for about nine pounds.

It saves on dental bills and split fingernails.


Tidy up the wires by bending the ends over a little and twisting them to make a good contact.


All this is so you can check that your light is working fine before putting it in.  Using a nine volt 'square' battery touch the wires to the plus and minus terminals.  It doesn't matter which wires go to which terminal.  A round battery will do - using the top and bottom but is more fiddly if you don't have three hands.

If a bulb doesn't light up it is worth trying to tighten it in its socket before flinging the light at the wall and hopping off out to buy another.  They are notorious for wiggling loose.  It may even be worth changing the bulb if that hasn't worked - assuming you have a spare.  After five projects and as seven years it has never happened to me, so clearly it is pretty rare.


Most lights you will buy have a spongy sticky pad where the wire comes though - I always remove these as I don't like the way it makes the light stand away from the ceiling or wall.  I then have a heck of a time gluing the light to the ceiling without making a mess with the glue.  I use superglue gel in very, very tiny amounts around the brass rim and then have to get the light in place very quickly before it 'goes off'.


On this occasion I was scuppered because the wire came through a hole in the side of the mount rather than (the usual) little nick between the mount and the sticky pad.  I was wary about having to remove the sticky tab and pulling the wire back through to the centre.  So, as the tab (luckily) was very thin I left it as it was and decided to use what I'd been given to stick the light in place.


When you drill down through the ceiling you almost always have a bit of scruffy wood that has been pressed out as the drill came though.  Don't worry about picking this off carefully to tidy up the hole and make the surrounding area flat.  The lights usually have fair size mounts on them which will cover up any mess.


The next step is one of personal choice.  You can twist the copper ends together neatly and tightly and push those upwards through the hole.  I find this nigh on impossible.  It is always hard to see where the hole is precisely and you won't have made a huge exit for the wire so there's not a lot of wiggle room.  I just sacrifice a bit more wire and trim back to where the wire is a single strip again.  This makes a nice rigid piece of wire to poke through the hole.

Remove the protective covering over the sticky pad or put super glue gel carefully on the edges of the mount - keep it to the inside edge so it doesn't squeeze out on to the ceiling.  There is an art to gluing tidily.  Practice makes perfect.  Whichever method you are using always make sure you put the wire exit hole or nick or any other flaw on the mount to the back of the room so you aren't staring it in the face when the light is in place.  You really only have one shot of sticking it in place well.  Gently pull on the wire, supporting the light at the same time, until the mount is where you want it and press it firmly in place.


I haven't cut a groove for this particular wire to lie in or a hole for it to exit through the back panel yet.  I am pretty sure I will be laying a cardboard painted cover over the wires on this level and may not need the grooves.  I will drill the back holes all at the same time when the three rooms are completed and I am ready to tidy up the wiring and attach the power supply.


Hey presto one light fitted and room furnished all ready for dressing.  The hangers, hair dryer and gel have found their way in and I have a bedding kit to make up along with a swivel mirror and other 'thoughts' to share with you next time.


For now, Nighty, night-shirts.

Thursday, 7 February 2019

Trying hard to be rid of us

Those of us using Google's Blogger for our blogs have known for a long time that it seems to be on borrowed time.  Google has no qualms about killing products that no longer bring it enough new users.  Indeed I am fairly sure I began My Clavering blog in 1999 with something called Pages or Sites??? and was eventually compelled to move over to Blogger in 2010.

We then got 'forced' into using Google+ when they thought they could compete with Facebook.  We know how that turned out.......  and they are now killing off Google+ with very little warning.  This has appeared on all my admin pages:

Following the announcement of Google+ API deprecation scheduled for March 2019, a number of changes will be made to Blogger’s Google+ integration on 4 February 2019. 

Google+ widgets: Support for the '+1 Button', 'Google+ Followers' and 'Google+ Badge' widgets in Layout will no longer be available. All instances of these widgets will be removed from your blog. 

+1 buttons: The +1/G+ buttons and Google+ share links below blog posts and in the navigation bar will be removed. 

Please note that if you have a custom template that includes Google+ features, you may need to update your template. Please contact your template supplier for advice. 

Google+ Comments: Support for Google+ comments will be turned down, and all blogs using Google+ comments will be reverted back to using Blogger comments. Unfortunately, comments posted as Google+ comments cannot be migrated to Blogger and will no longer appear on your blog. 

Learn more.


If you click on 'Learn more' there is a load of boggling information for non-techies like me but the most worrying aspect are these little gems:

Please note that if you have a custom template that includes Google+ features, you may need to update your template. Please contact your template supplier for advice.

Google+ Comments: Support for Google+ Comments will be turned down, and all blogs using Google+ Comments will be reverted back to using Blogger comments on 4 February 2019. Unfortunately, comments posted as Google+ comments cannot be migrated to Blogger and will no longer appear on your blog.


Right now as far as I can see, on this blog at least, all is well but I thought I would give you the heads-up in case I (or you!) suddenly disappear into the ether.

You may also have noticed that I now have chosen to 'approve' comments before posting.  I have had such a load of spam inserted throughout several blogs and retrospectively added back through many years that it became a real chore 'cleaning up' all the time.

Hopefully we will all stay happy and connected for many years to come.


Wednesday, 30 January 2019

Some absolute gems

I was just saying to my daughter today that I haven't done a thing on Dalton house for a year now.  This led me to have a look at this blog - hey, guess what it's been more like eighteen months!!!

All I can say is somewhere around that time I was not in a great place health-wise - I am still not on fighting form - and then later that year we moved house from Bury, Lancashire to Newtongrange, Scotland.  I am wary about saying I hope to get back on track soon as I may well have said that before.😏

Meanwhile, back at the camp, some of my mojo must have returned because I have just bought these fabulous little bits from a very talented lady.  I follow her blog Mitch Moo Miniatures which I heartily commend to you.  She makes wonderful things for her own projects and is super generous in sharing the how-to with her readers.  For those of us with less talent/time/patience she occasionally makes and sells a piece or two on her Etsy site, Mitchy Moo Miniatures.  Here is what I have just snaffled.  I make no apology for giving each item two pictures as I want you to see her perfect scale.


So, so dainty and detailed

Closer up

Maybe this is a normal hairdryer alongside a giant's hair dryer

Just look at the detail on the back of it, love the hair gel that comes with it

My quite small specs and Pepper's really small specs

Sorry they are still in their bags and, yes, they have lenses in them

Just a decor item for somewhere


Footnote:  

Jodi Hippler has just left me a message saying:  for those with Instagram Pepper posts photos of her wonders regularly, so you can follow her via @peppermitchelson.

Thanks Jodi.


Monday, 2 July 2018

Digital Books

I mentioned having done a digital book for Bentleys.  Here is a sample ......


If you want to see it all go to....


https://bentleysdressshop.blogspot.com/

Sunday, 1 July 2018

A day late

Apologies for being a day late with this week's post.  I spent my blog time yesterday fiddling around making a digital book to record Bentleys (a previous build).  More of this when it comes to fruition but suffice it to say it took much, much longer to do than I imagined.

Meanwhile in dribs and drabs throughout the week I managed to get the Rec room and the Mud room sorted.

These are the terrific boxes I keep my 'dressing stuff in.  They were sold as bead boxes for a couple of dollars in Wal Mart.  I try to collect things for one room in the same box so I don't forget what I have and duplicate things.


That worked really well with the three cats I seem to have acquired.  At least the quality improves as I go along.  All I can say is that I once owned a cat as ugly as the first one here.  He was also extremely stupid and quickly earned the name pudding, so I have something of an attachment to the ugliest one.  I suspect Mrs Perky on the right will get to inhabit the house.


A couple of the mini objects in this house sort of work.  The jukebox lights up and plays a couple of songs and the washing machine in the mud room is a Miele (can't find them any more!!!) and it lights up, the drum spins, it makes washing noises and then makes a spinning noise followed by a beep when the washing is finished.  The door also opens.  Such a nice piece of kit.  I used to have their cooker too in a previous project and that had hobs that lit and made cooking noises.


I am especially fond of this little basket of sea shells as they were all found by me during my time in Naples (Florida)  I had a sort of challenge with myself to find the smallest shell possible each time we went to the beach and I ended up with a zillion very teeny ones.  They are miniatures in their own right.


These must be the world's tidiest teenagers - biscuits on a plate and liquorice allsorts in a bowl!!!  What can I say.....I train my children well...... especially the resin ones.  Incidentally every sweetie and every biscuit is a loose separate item.  Such talented people around.  For non-UK chums each of these biscuits is a recognisable product.


My favourite object here is the cute little stapler.  Needs a bit more 'stuff' yet


Pretty much a shell collection going on here.  Indeed there is a box open with two new shells in that haven't found their home yet.  Again it needs games and stuff for the empty shells.  The china piggy bank is in memory of one I had for many, many years called Daisy Grunter.  Spot the mobile phone.


.....   and so the room goes back together......  I need a couple of posters for the back wall.  I am just not sure what to have.  Might go retro and have something to represent what my kids liked .....Star Wars? and....?


A few nice details in the mud room such as the whiteboard weekly planning sheet with pen on the wall, the smoke alarm, the alarm system board for this part of the house.  There is cleaning stuff left out as Simon has been cleaning his skate board.  Apologies for the poor quality photo, it was taken late in the day and in poor light.


I have just added a couple of things in the dining room since you last saw it.  I love the tiny glass horse on the huntboard, bought when I was doing quarter scale.  This photo reminds me that I need to clean up and re-trim the chairs.  They had some very flashy gold braid round them that I unceremoniously ripped off.  I really need to get down to filling the cabinets and dressing the tables - I actually have more than I need to do this.  I keep sort of hanging on in hopes of making another huntboard which is silly as that in itself doesn't prohibit dressing what's there.  Apologies for the BFG in the mirror.


Saturday, 23 June 2018

Slowly, slowly...

I didn't get into my work room until three today but I thought I would crack on and get several rooms back in place.  In three hours (!) I only managed to do the library.  It is astounding where the time goes when you are fiddling around with tiddly things.  I confess much of the time was lost in simply rummaging around the 'dressing' boxes to see what I had that might work in there.

Firstly, I had over three hundred books to shelve; that can take a while when you are actually fussy as to what should go next to what!


I then  spent (wasted?) ages trying to make something of these...

I began by gluing the split ammonite on to a small base but I then found the glass display jars so thought I could perhaps put the two ammonite pieces inside those.  I love the fossils in rocks, so cleverly made.  Before someone tells me the ammonites would be very large when scaled up I did google it and the largest specimen found was eight feet so I think I am way inside that parameter.  These are real incidentally.


The complete ammonite needed raising up as it looked silly sitting at the bottom of the glass jar.  I found some corners of door frames and knocked off the edges with rough sandpaper to get it to fit in the jar... it needed more sanding than you see here.


Et voila two 18th century specimens that belonged to a favourite poet perhaps.


Just a reminder of the trompe-l'oeil effect when the door is open.  I am still very happy with that.


The table holds a lovely art folder containing some prints of tropical plants.  The eighteenth century was one of discovering new continents and new botany and it is recorded in many poems of the time.
(Elizabeth's field of interest and work)


There is also a collection of old maps showing the known world during the 1700s.


The display jars look good in place on the shelf to the right of the door at the back.  The small fossil is propped between some books.


I still have one shelf to fill on this right wall


Even more space over here on the left


 The shelves to the left of the door are probably finished.  As well as the books there is the larger fossil propped up, some really nice books which are printed and openable on the bottom shelf and a sweet little ancient illustrated book on a nice book-stand .


 Finally here is the library so far.  No idea why I thought the eagle added anything - it doesn't - that will be coming off!