Today I had a good long stare at Dalton House with the doors open and tried to see what it is that is blocking me from getting back to work on it. Other than the usual many layers of procrastination that I am good at, I decided it was the last of the electrics that are getting in my (mental if not physical) way and that these must be tackled. Having decided this at 4.50pm on a Saturday, following the chores of the day, it was really too late to get started other than to sort out what is going where and what I will need to actually do the task tomorrow. Procrastinating again???
There is another reason the last of the lighting has been slow to be wired up and that is I am not thrilled with some of the lights and I keep living in my fantasy world of 'something will turn up' - it doesn't and it hasn't.
This light for the apartment for example is not one I am thrilled with, but it will have to do.
I do like this pair of buffet lamps/stick lamps but the problem with these has been that they can go in three places and I like them equally in each of those rooms so I am having trouble deciding where to fix them. Right now they are in the formal sitting room but they look good in the dining room and look equally nice on the two hall tables I think the decision is being made for me as they will be simpler to put here than in wither of the other rooms which are decorated and trimmed. Prevarication this time instead of procrastination....
This table lamp/work-light seems oversized and is not 'happy' anywhere. It might be a useful strong light in an area where the mini work is done.
This is the previous lamp's big brother and will probably work OK in the corner of the apartment sitting room. Like Junior, it refuses to stand up and they will need tacky wax to keep them in place. I also have a centre light to add to this room, again it is one I have been hoping to improve on.
I love the following electrical 'finishing' items from Delph and they will be part of tomorrow's electrifying-the-house project. They are all non-working, of course, but they do a lovely job in a modern setting for adding to the reality of the place. I am not sure the alarm box can go on the outside of the Grade two-listed Georgian home but the P.I.R.s will be allowed in all the more modern rooms of the residence.
These light switches look fabulous in situ, as do the rest of Delph's creations. Just the right size. In our house they are installed at the new regulation level (lower than they used to be). In dolls house terms - around 4 inches up from the floor.
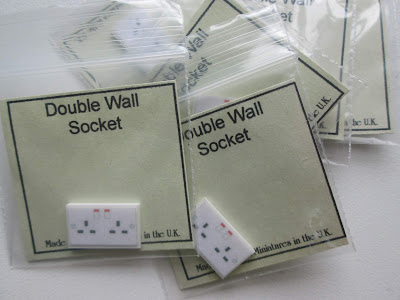
Here are the equally terrific wall sockets. Incidentally if you do put these in any of your project they usually go in corners of rooms 1.5 inches up from the floor and 1.5 inches away from a corner. Our real-life, new build house has them in this position. (18 inches of course not 1.5 inches) Obviously you can stray from this just as in real life if a socket needs to be somewhere else.
.... and a cooker panel
Possibly my favourite things are the plugs with little holes in. I asked if Delph could make me these; they obliged and have gone on to sell them - I hope successfully. You will see their magic on Monday.
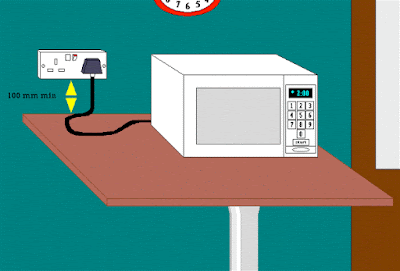
If it is useful to you modernists out there, here are the current UK electrical outlets regulations:
The other thing that has been holding me back is that all but one of these lights are going through the back or the sides of the house. The back exit is fine, other than drilling through a flimsy plywood back wall which won't be happy being 'shoved'. These wires will go straight out and to the terminal block, but the two side exits create something of a problem.
I have one side exit already in place where I installed a wall light . I made a hole through the wall and then made a groove from there to another hole at floor level. The wire then went outside into the groove and back through to the inside and did the usual exit to the back along the edge of the wall before the skirting boards went in. The wire was laid in the groove, taped over with masking tape and painted over. It is pretty much invisible - I had a hard time trying to make it show up on the photograph. It will also improve when the sides get their second coat of paint at the end of the build. I can't do this 'neat' solution as all the trims are now in place, so the wire has to exit the side wall and get to the back of the house on the outside.
I really don't want to have to make the wretched grooves for these two lamps along almost the whole length of the sides, front to back. I don't have a suitable tool for making grooves and have always had to codge them best I can in various ways. Truly, this has been a major stumbling block in the way of my getting on with this job. I have come to the conclusion that I will just surface run them and tape and paint. If that proves too ugly I will just find something to cover the whole of each side, leaving the wires in the sandwich between the dolls house wood and the 'cover'.

If anyone has any thoughts, better ideas, handy tips, anything, to increase my motivation please send me a comment here or email. xx (mormson@gmail.com)
Wish me a happy and fruitful Dalton Sunday tomorrow.
----------------------------------------------------------------------------------------------
PS: The idea for the Grip Tape came from Jodi Hippler who does a fabulous blog. I commend it to you. Lots of very different projects, she kit-bashes and makes most of her own stuff and is generous at sharing with excellent tutorials click here: My Miniature Madness


All your electrical components will really add to the modern realism of your build. But I share your lighting pain. It never seems easy for me either. There is just so little available for lighting. The only option really is to modify the meagre options available. Or have a go at making your own. Could you try running some tape wire down the sides of the house, as that would be easier to hide? Hope you work it out with minimal fuss.
ReplyDeleteI totally agree with modifying or making your own lighting if you can. My biggest stumbling block, as in real life, is not really knowing what I want 'until I see it'. So that is the kind of shopping I do - very time wasting and mostly disappointing. So, I kind of know I don't really want what I have got but can't think what I might want (to make) instead. Ooooh tape wire added into my round-wire world, now that sounds scary.
DeleteOh lighting... yeah, I will put that off as long as possible because it's so hard to do! I'm sure yours will come out great.
ReplyDeleteThe first time, years ago, was very scary as I had never been the slightest bit interested in doing anything electrical in real world but I discovered what we need to know and do here is pretty easy to get your head around. It is just the actual doing of it that I find tedious, slow, a bit challenging in the sense of hiding stuff and so will . as you say, keep putting it off. Hey ho, cup of tea to finish, a couple of emails to type and I will be starting..... do you hear the procrastination starting.....
DeleteHi Marilyn!
ReplyDeleteI love the lamps, too, and think if you wanted to do them in all three rooms you could just add creative decor to make them look different enough. Such as - fringe on the bottom of painted gold lamp shades, adding metal balls (think dog tag chain) to strategic areas on the lamp bases, tiny flat back beads or even glue dots painted over to look like metal studs.
The outlets are great and it was interesting to see the UK diagram!
I am the "grip tape girl" and am so happy that you found it useful! If you could find a way to make all of the side wires join together on the sides, you could use channel molding run vertically and horizontally to conceal them. If painted with paint/sand mixture, they could look like a stone or concrete linear feature like a grid.
I know you'll come up with something fantastic, and I look forward to your next post!
You have such confidence in me Jodi, all I have to do now is live up to it. I am typing this having just finished putting in my last light so do not tempt me to more lamps. In truth those lovely stick lamps were a one-off buy at an American show so I would never be able to get them again. Having just struggled them in place and testing they were still working OK at various stages, they probably won't be worth the hassle - the light is very small and dim and the shades are very thick. 🤣
DeleteI must remember to credit you with the grip tape idea 😄. Thank you. I am dreadful at muddling up the blogs I follow and forgetting who told me what. Apologies.
DeleteI have added a PS to the post re the grip tape and directed folk to your fabulous blog
DeleteAhhhhhh lighting- the perpetual bugaboo of many dollhouse builds. Even so, I think that the lamps you've chosen will be fine, Marilyn, although I feel your confusion of not knowing exactly what you're looking for until you see it- it's the same for me.
ReplyDeleteThe candlestick lamps are my favourites as I have several of them myself since as you say, they DO look good in so many different placements.
I absolutely ADORE your modern light switches and plugs- they are FABULOUS and will add even more realism to your dollhouse rooms.
And Jodi's idea of using the skateboard grip tape for the Mansard Roof is going to become a CLASSIC, and will to translate towards finishing your roof to perfection!
elizabeth
Hi Elizabeth - I too love the stick lamps but can't find any in the UK. This pair were the only two on a stand in a US show and I think they may even have been second-hand judging from their condition and packaging. I am trying not to search too hard because if I find them I will have to put them in!!! I did manage to go back and credit Jodi for the grip tape - such a good idea. Nice to see you.
Delete